Pipelines
Pipelines are where connected data becomes operational logic inside StreamPipes. They let you take one or more live streams, combine them with processors and sinks, and turn that flow into something useful: filtering, enrichment, alerting, routing, storage, or analytics.
The pipeline module uses an extensible set of Extensions such as data processors and data sinks and lets users define stream processing logic based on live data streams.
What a pipeline is for
A pipeline usually starts with a live stream, adds zero or more processing steps, and ends in one or more sinks. That sounds abstract at first, but in practice most pipelines serve straightforward industrial goals. A pipeline may keep only events above a threshold, enrich raw measurements with labels or derived values, forward selected events to another system, or persist curated results separately from the raw source data.
A typical operational pipeline
A team receives machine temperature values as a live stream. They filter for high readings, enrich the event with a severity label, and send the result to both a notification sink and a persisted dataset. The pipeline is not an experiment; it is a maintained operational flow.
Understand the current pipeline workspace
The pipeline feature is split across three places, and each one has a different job.
The Pipeline Editor is where you design or change the flow. The Pipeline Overview is where you operate many pipelines at once. The Pipeline Details view is where you inspect one pipeline more deeply, including its structure, status, metrics, logs, and code view.
This split is useful because it matches how people actually work. You usually build in the editor, operate from the overview, and investigate in the details view.
Pipeline Editor
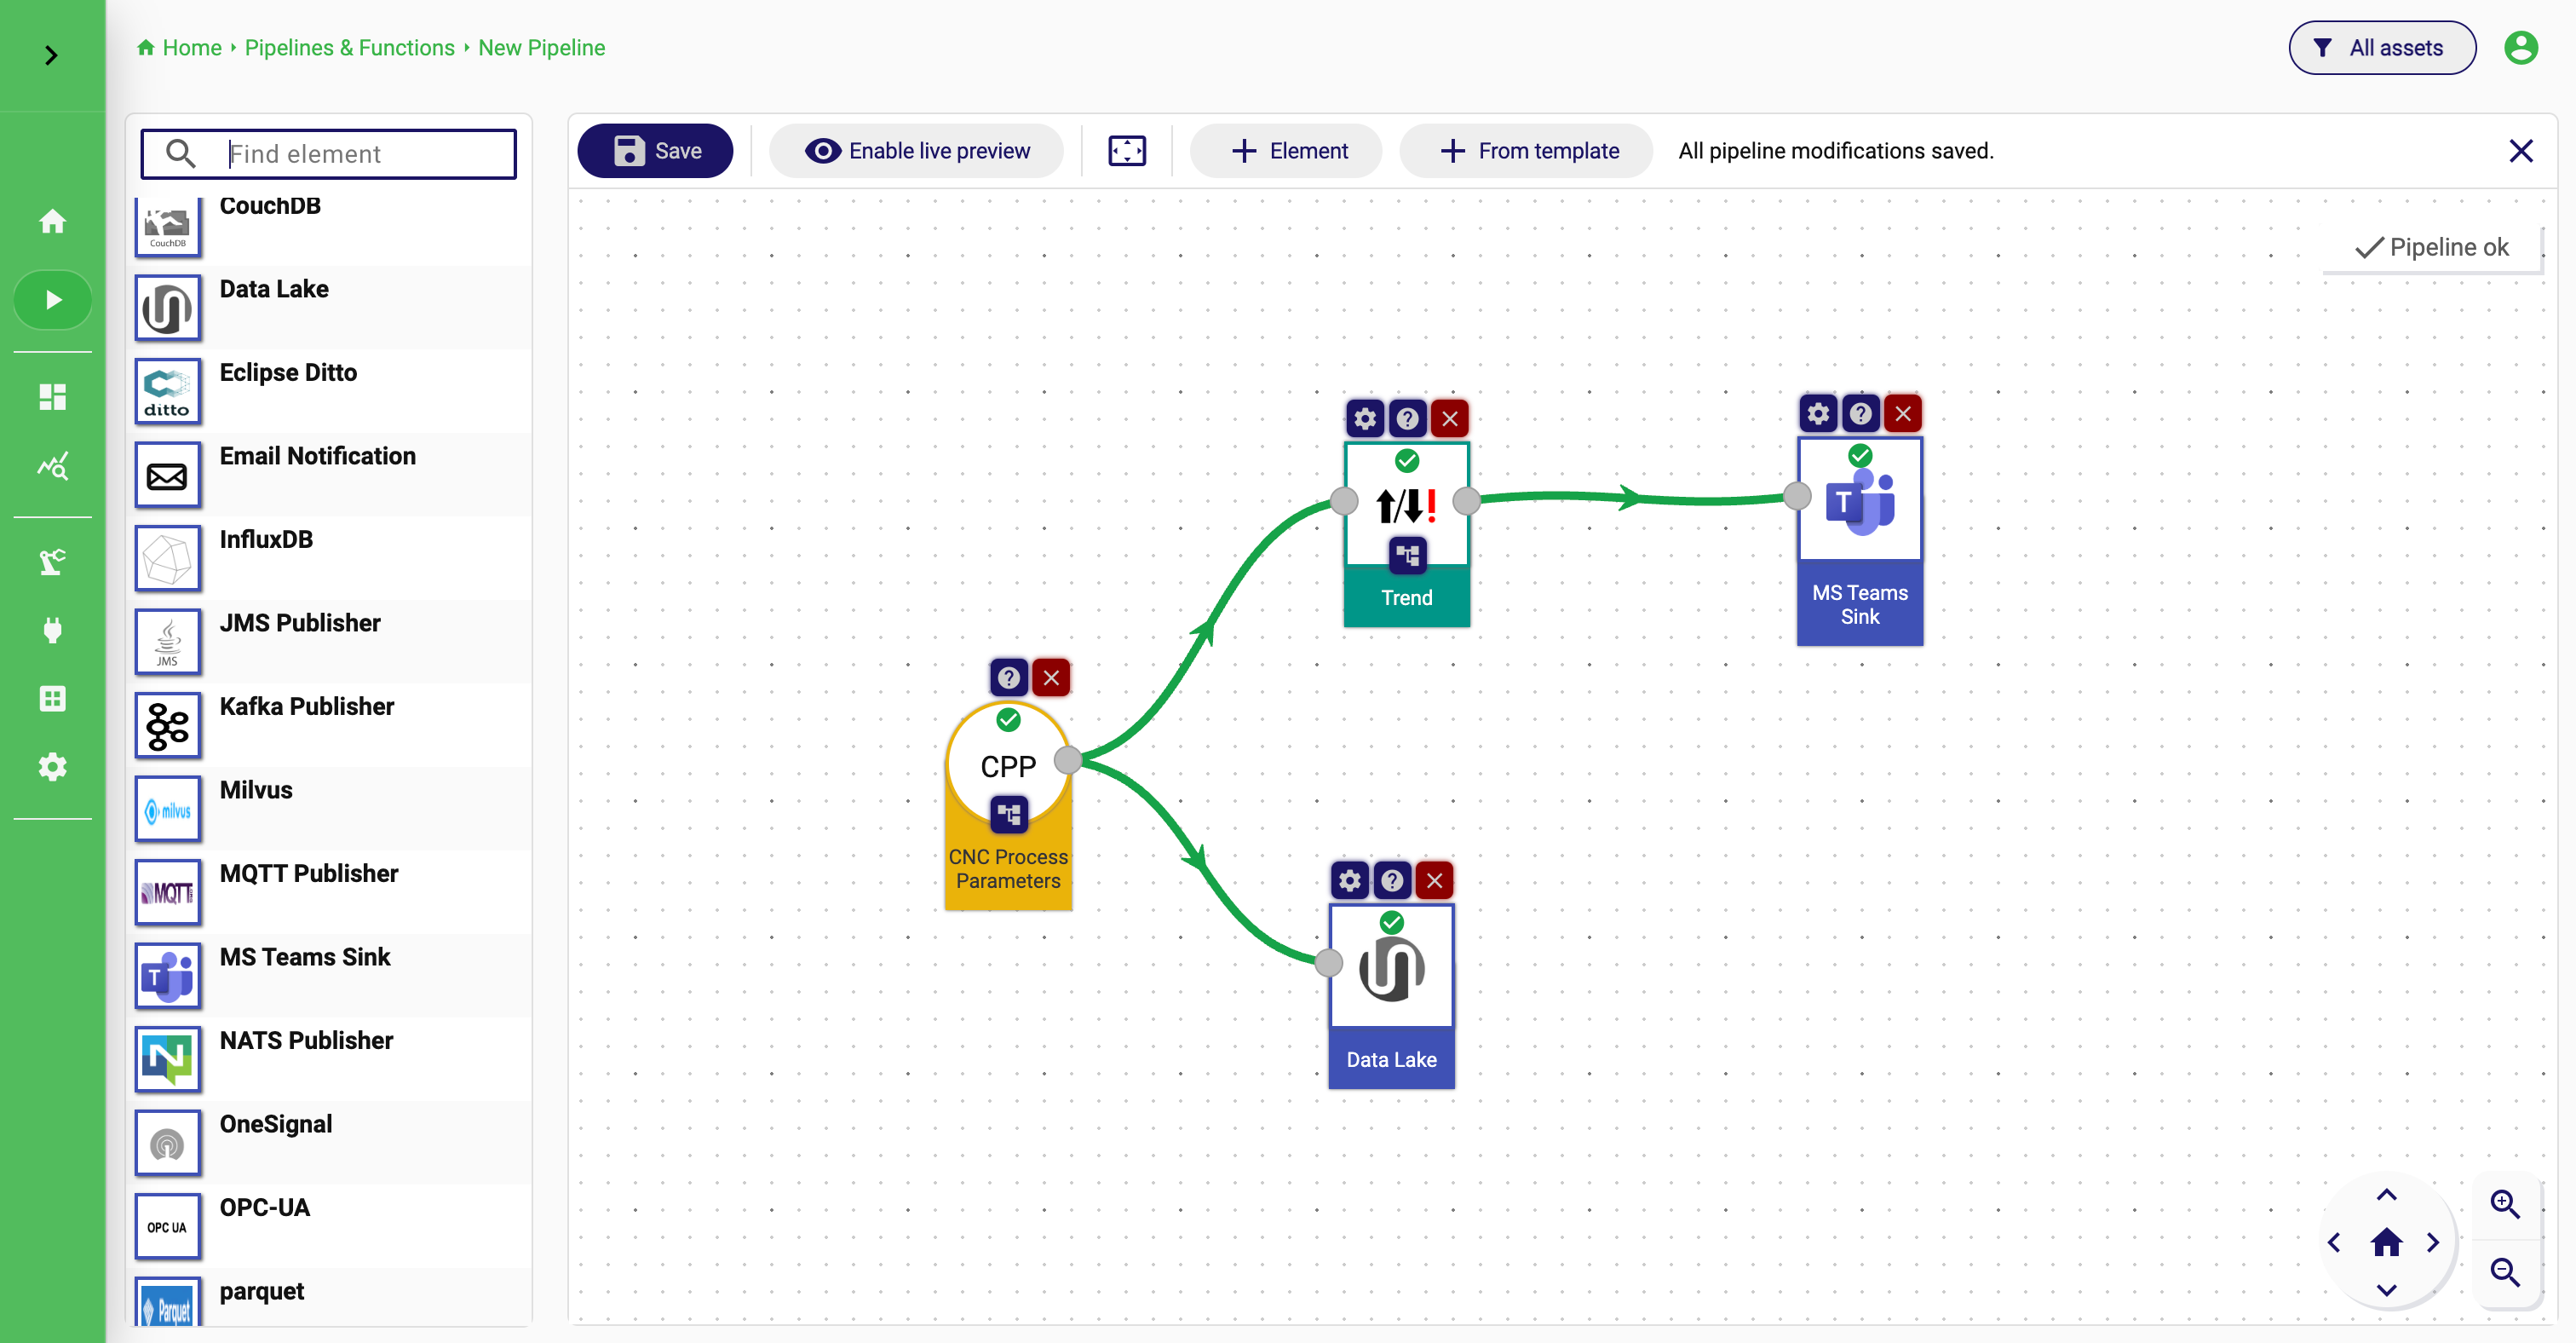
Build the pipeline from left to right
The editor combines an element catalog on the left with the assembly canvas on the right. The catalog contains the installed streams, processors, and sinks that are available in the current StreamPipes installation.
Most pipelines are easiest to build from left to right. Start with the source stream, connect a processor or sink, and continue from there until the flow matches the use case.
Place the input stream
Start with the live stream that should feed the pipeline. This is the source that defines the first schema users will work with.
Add processors or sinks
Continue the flow by connecting processors and sinks that match the desired behavior, such as filtering, enrichment, storage, or notification.
Configure in context
Whenever a new element is connected, StreamPipes opens its configuration against the actual upstream schema so the user can map fields with confidence.
Validate before saving
Use preview and validation features while the pipeline is still in the editor so the final saved flow already reflects real live data behavior.
Elements can be added by dragging them from the catalog into the canvas or by using Add pipeline element in the toolbar. The toolbar also includes Add from template, which is useful when a team already has a standard pipeline fragment or a recurring structural pattern.
Let compatibility checks guide the design
One of the most important usability features in the editor is that StreamPipes validates connections as you build. When you connect two elements, the platform checks whether the output of the first element is compatible with the input requirements of the second one. If the connection is valid, the configuration dialog opens immediately.
This means users do not need to guess whether an element combination should work. The editor helps steer them toward valid flows early, before they spend time configuring something impossible.
The same idea appears again later through Compatible Elements. Once an element is on the canvas, users can inspect which processors or sinks fit that element next. This is especially useful when someone knows the data they have at a certain point in the flow but has not yet decided which operation should follow.
Configure each element in the context of the real schema
After connecting a processor or sink, StreamPipes opens the element configuration dialog. This is where the editor becomes most helpful for real users, because the configuration is not shown in isolation. It is shown in the context of the actual upstream schema.
The dialog can expose the input schema directly, show the element documentation next to the settings, reduce visual noise with Show only recommended settings, and reuse or create configuration templates for recurring patterns.
That combination matters because it reduces one of the biggest sources of pipeline errors: mapping the wrong field simply because the user had to remember the schema mentally instead of seeing it.
Why input schema context matters
A processor expects a measurement field, but the incoming stream also contains identifiers, timestamps, and several dimensions. Seeing the input schema in the configuration dialog makes it much easier to choose the real measurement field instead of guessing from field names alone.
When the incoming schema is large, Show only recommended settings can be a practical guide. It is not a limitation; it is a way to focus first on the fields StreamPipes considers most likely to be relevant. If the relevant field is not in that subset, the user can simply switch back to the full view.
Use editor features as working tools, not ornaments
The top toolbar contains a small set of features that matter during actual pipeline work.
Save is the obvious one, but it only becomes available once the current flow passes validation. Enable live preview is more important than it may sound because it lets users check the behavior of a flow while still editing it. Auto Layout helps once a canvas has been rearranged several times and is harder to read. Clear assembly is mainly useful when starting over from scratch.
These are not just convenience buttons. They support the working style that produces better pipelines: build a little, preview a little, fix assumptions early, and save only once the flow reflects the intended behavior.
Save the pipeline deliberately
When the flow is ready, the save dialog defines how it should become a platform resource. This is where the visual design turns into an operational artifact.
The save flow lets you set the pipeline name and description, decide whether the pipeline should start immediately, decide whether to navigate to the overview afterwards, optionally link the pipeline to assets, and inspect the pipeline configuration as code.
If you are editing an existing pipeline, StreamPipes also distinguishes between Update pipeline and Create new pipeline. This is an important operational distinction. Updating changes the existing artifact. Creating a new pipeline preserves the previous version and stores the modified flow separately.
That makes it practical to test a new thresholding or enrichment strategy without overwriting the current production pipeline immediately.
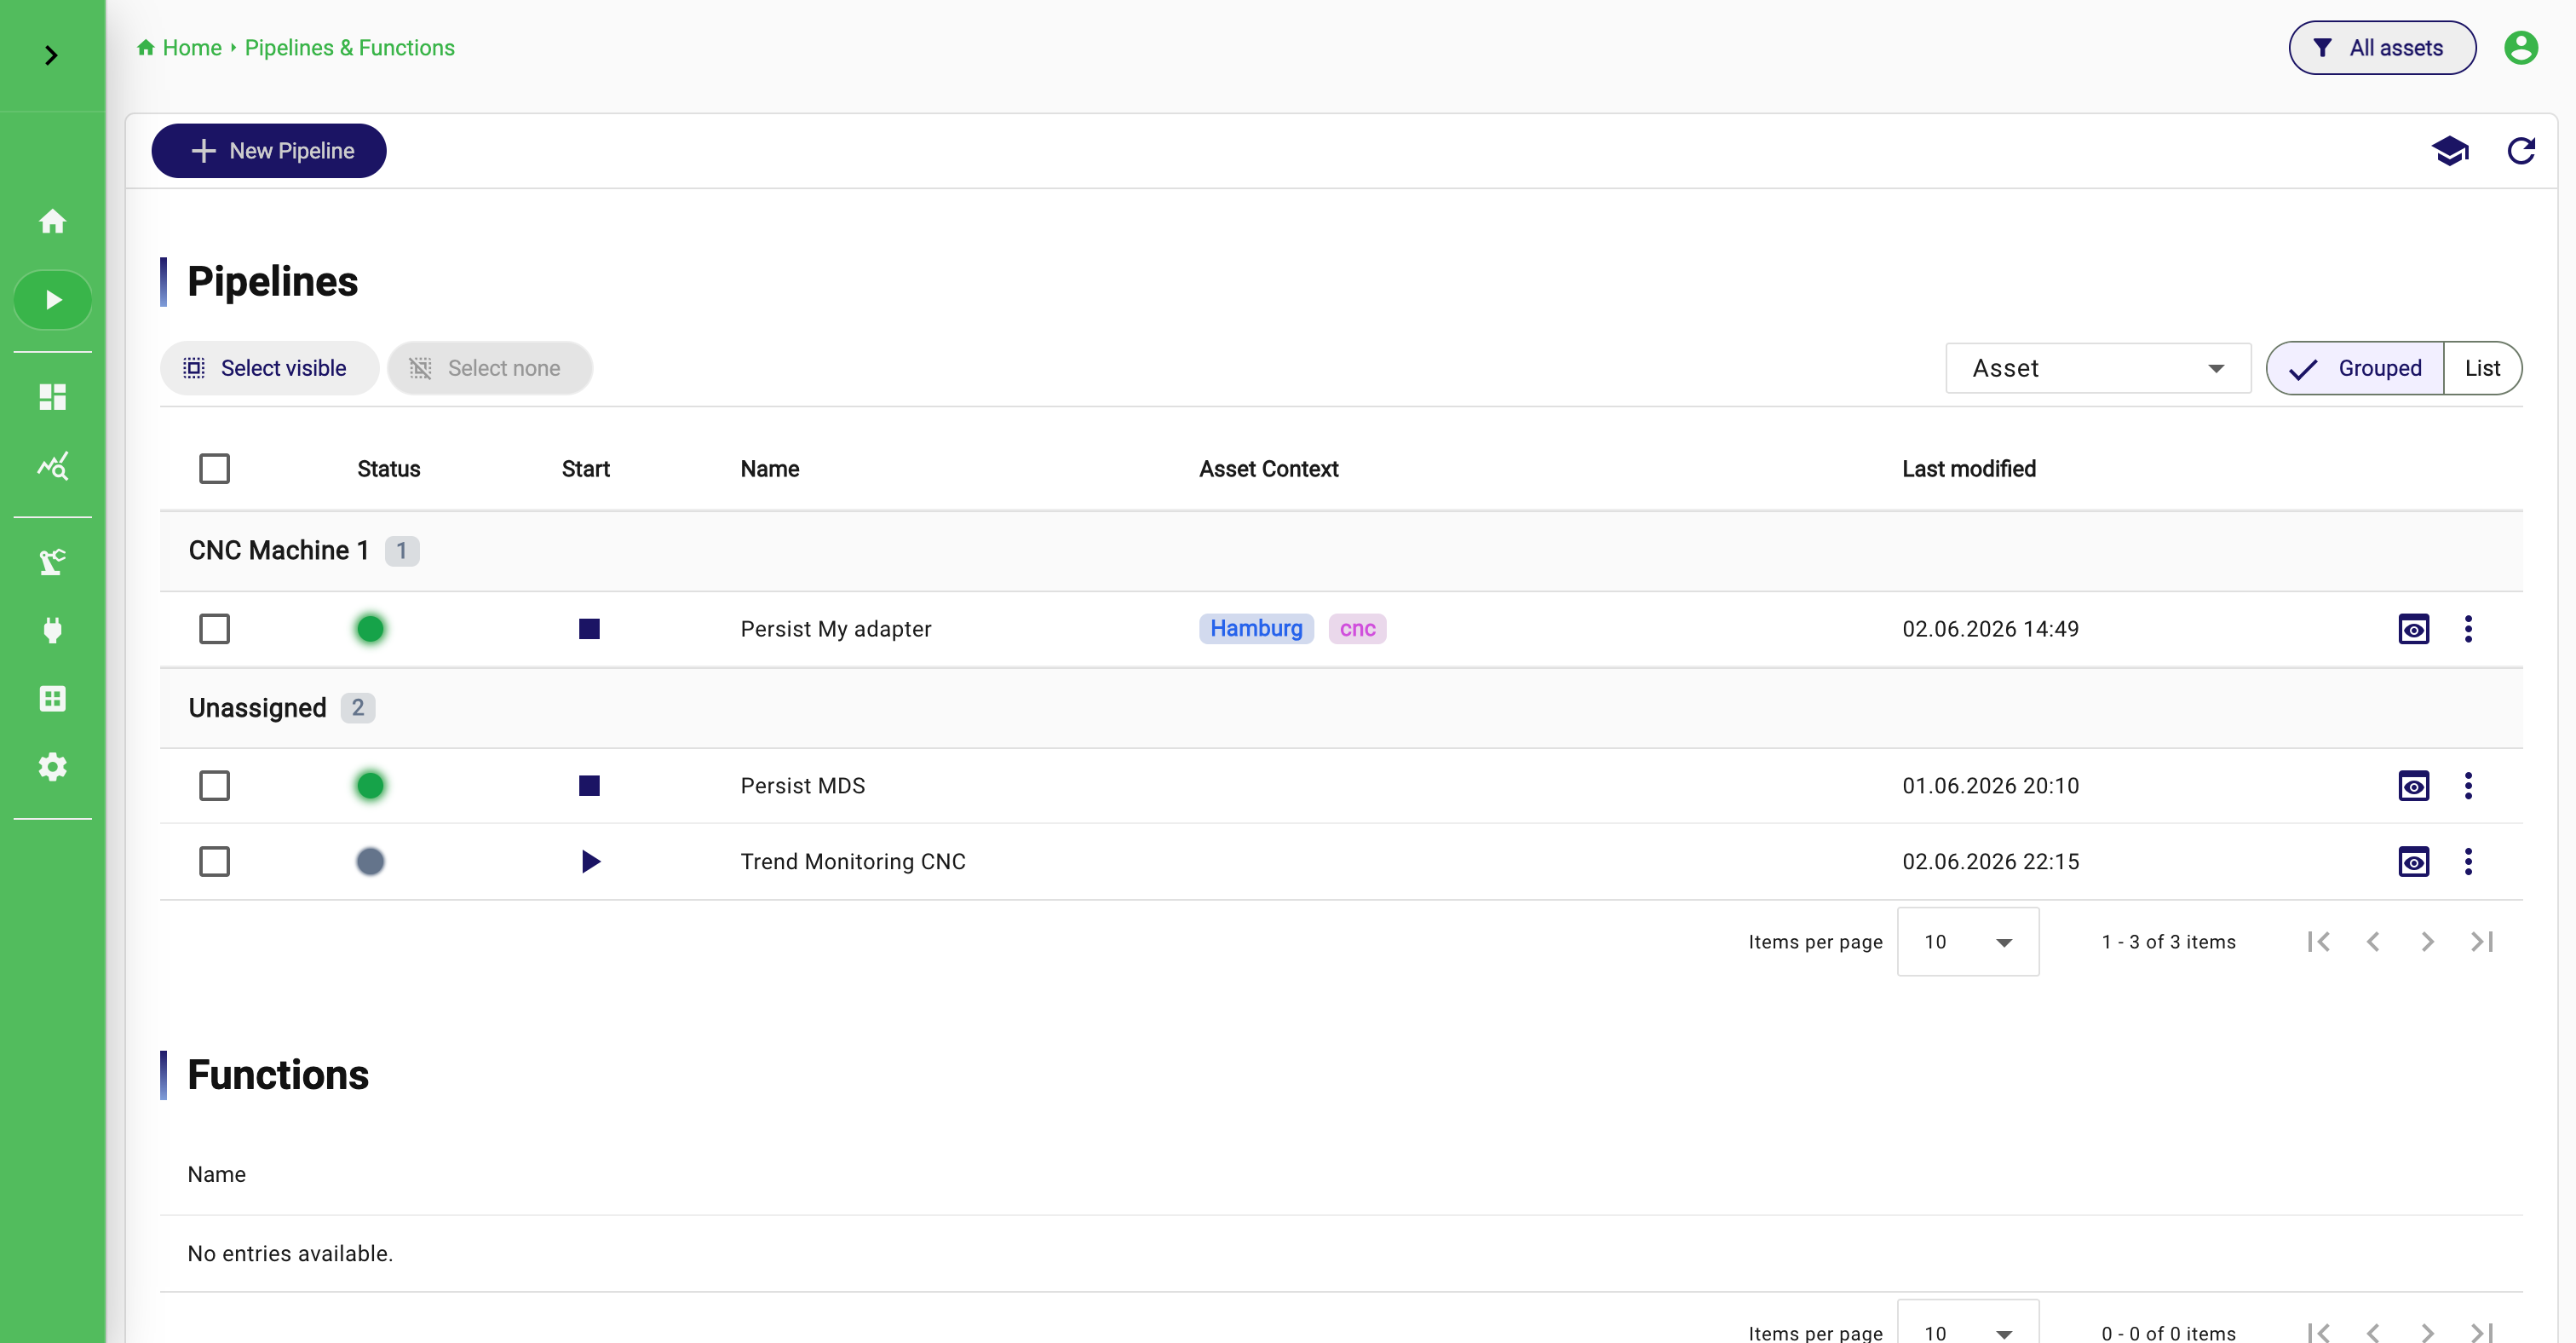
Operate pipelines from the overview
Once a pipeline exists, the Pipeline Overview becomes the main operational entry point. It lists the existing pipelines and exposes their current state in a compact way. In practice, users come here to answer questions such as: Which pipelines are running? Which ones are stopped? Which ones require attention? Which ones should be started or stopped right now?
The overview is also where lifecycle management becomes efficient. You can start and stop pipelines directly without opening each one individually. For users with write privileges, bulk actions make this even more useful when several related pipelines must be activated or paused together.
The important thing to understand is that a pipeline can exist even when it is not currently healthy or operationally valid. Upstream schema changes, missing dependencies, or other inconsistencies can put a pipeline into a state where it needs review. The overview is designed to surface exactly that kind of situation quickly.
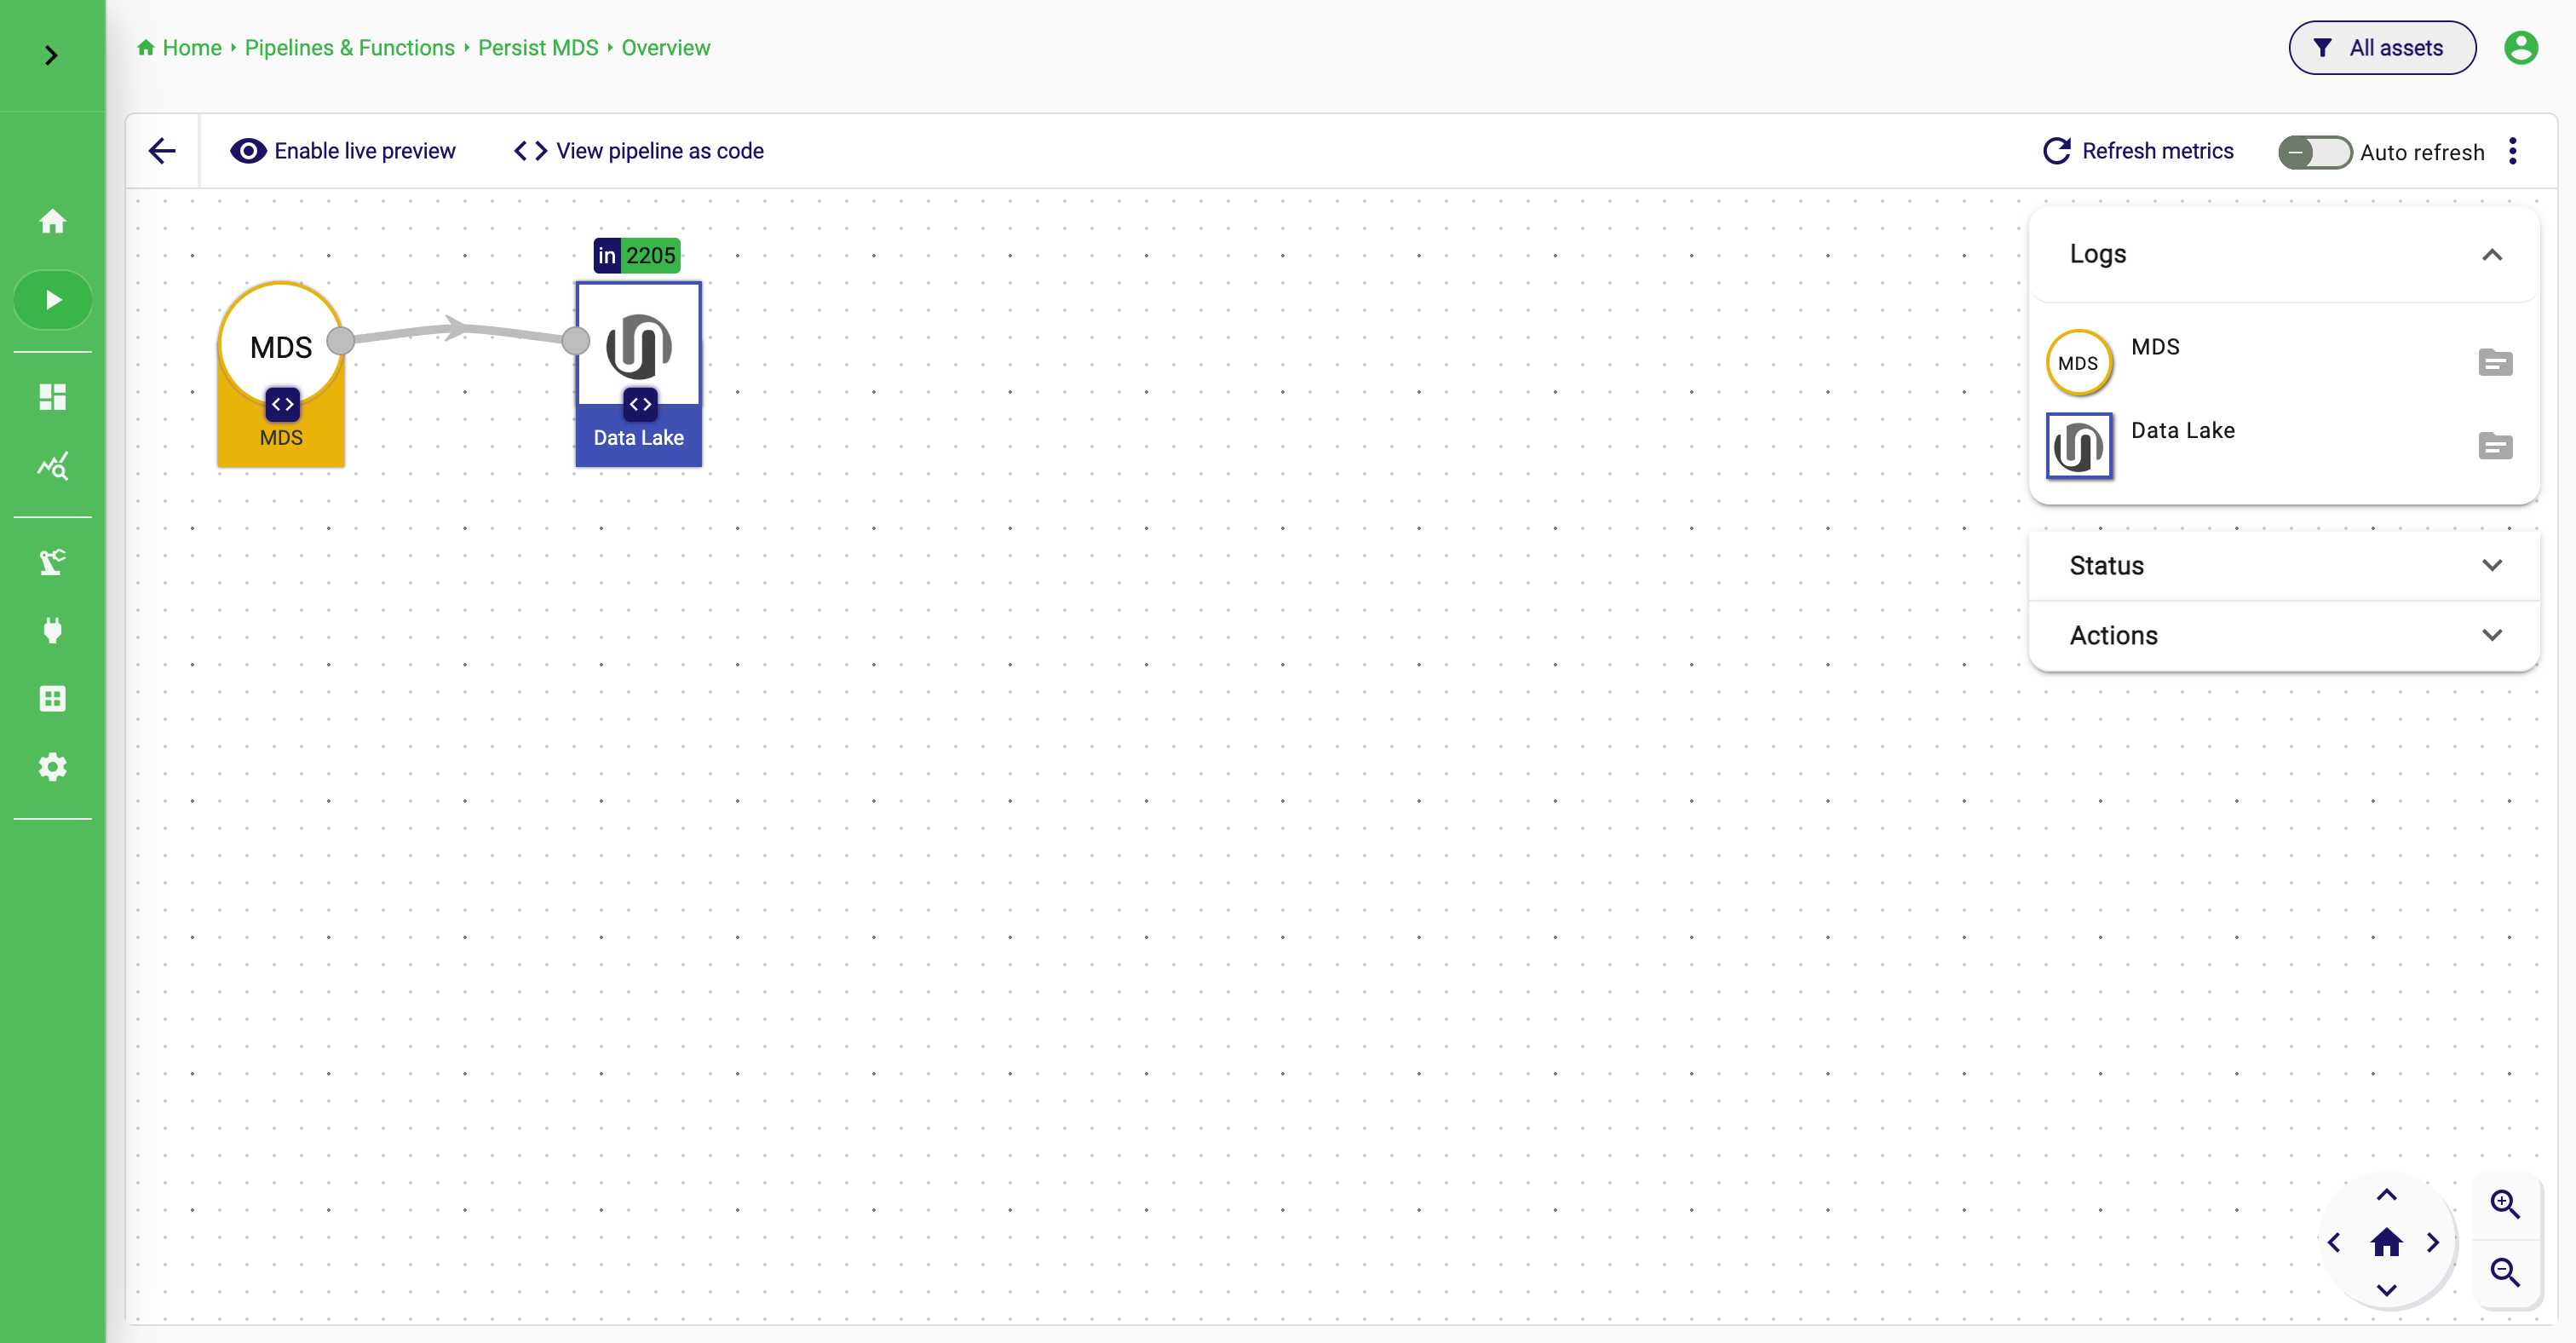
Use the details view when the overview is no longer enough
The Pipeline Details view is where one pipeline can be inspected more deeply. It combines a visual representation of the pipeline with operational panels such as logs, status, actions, and code view.
This is the place to go when the pipeline should be understood, not just operated. If a pipeline is marked as requiring attention, the details view is usually the right place to investigate why. You can inspect logs, refresh metrics, enable live preview, and look at the pipeline structure in one screen.
The details toolbar also includes View pipeline as code, which makes the underlying compact representation visible. That is useful for inspection, comparison across environments, and programmatic reuse.
Operate and Inspect Pipelines
Pipeline Overview
Pipeline Details
Treat templates as a standardization tool
Templates appear in several parts of the current pipeline experience. You can start a flow from a pipeline-level template or reuse element-level configuration templates inside individual dialogs.
The real value of templates is not only speed. It is consistency. When teams repeatedly build the same notification flow, the same sink configuration, or the same enrichment pattern, templates reduce manual repetition and lower the risk of small configuration differences that later become operational problems.
Pipelines as code
Pipelines can also be represented in a compact text format and created over the API. This is useful when pipeline definitions should be versioned, reviewed, promoted between environments, or generated programmatically.
The current UI exposes this compact representation in two helpful places: during save through Show pipeline configuration as code, and later in the details view through View pipeline as code. That makes the UI the best starting point for most users. Build the pipeline visually first, validate it, and only then reuse the compact definition for automation.
The compact model represents the same decisions users already made in the editor: pipeline identity, the ordered elements, how those elements are connected, element-specific configuration, and create options such as whether the pipeline should start immediately.
Example pipeline definition
id: my-pipeline
name: "Density Filter Pipeline"
description: "A pipeline that filters data based on the density and stores it in a data lake."
pipelineElements:
  - type: stream
    ref: stream01
    id: sp:spdatastream:GWWzMD
  - type: processor
    ref: processor01
    id: org.apache.streampipes.processors.filters.jvm.numericalfilter
    connectedTo:
      - stream01
    configuration:
      - number-mapping: s0::density
      - operation: <
      - value: "12"
  - type: sink
    ref: sink01
    id: org.apache.streampipes.sinks.internal.jvm.datalake
    connectedTo:
      - processor01
    configuration:
      - timestamp_mapping: s0::timestamp
      - db_measurement: my-measurement
      - schema_update: Update schema
      - dimensions_selection:
          - sensorId
      - ignore_duplicates: false
createOptions:
  start: false
To create such a compact pipeline over the API, send it to:
POST /streampipes-backend/api/v2/compact-pipelines
Content-Type: application/yml
Accept: application/yml
You can also send JSON by using application/json. Authentication is provided through:
X-API-USER: your username
X-API-KEY: your api key
The most reliable workflow is still to validate the pipeline visually first, then reuse the generated compact model. That keeps “pipeline as code” grounded in a pipeline that already works.
How to work well with pipelines
In practice, good pipeline work usually follows a predictable pattern. Start with one clear input stream. Add only the processors that the use case truly needs. Configure each element against the actual upstream schema. Use preview early. Save with a name and description that make operational sense. Only then start the flow against real data.
If you are coming from other tools such as Node-RED, don't start with rebuilding the behaviour. In StreamPipes, pipelines are supposed to be single-purpose analytics functions. If a pipeline serves different purposes and has many splits, it is often better to split it into multiple pipelines and manage them independently. Built-in features such as auto-migrations in case of changes in the related adapters make it easy to work with a larger number of pipelines.