Assets & Sites
Assets and sites give StreamPipes industrial context. They let you describe machines, lines, stations, and plants as real-world objects and then connect adapters, datasets, charts, dashboards, and pipelines to those objects.
Without this layer, many resources remain technically correct but operationally isolated. With it, StreamPipes becomes easier to navigate as an industrial data platform because users can move from the machine or line they care about to the resources that belong to it.
Understand the model first
The asset feature combines three ideas that work together.
Sites describe reusable location structures. Assets describe the industrial objects themselves. Asset links connect those objects to StreamPipes resources.
This separation matters. A site is not the same thing as a machine or a line. A site is shared location context. An asset is the industrial object you actually operate. Links are what make that object visible across the platform.
Why this model matters
A team may have several charts, datasets, and dashboards for one packaging line. Without assets, users need to remember names or search technically. With assets, they can open the line itself and find the related resources from there.
Sites are shared location context
Site data is managed centrally in Configuration > Sites. In practice, sites are useful when several assets share the same location structure and should reference it instead of duplicating it manually.
Think of sites as the reusable geography of the system: plant, building, hall, or area. The asset editor then references that shared structure rather than inventing its own local copy every time.
This is especially valuable in larger installations. If ten machines belong to the same factory site and production hall, you define the site once and assign it where needed. That keeps the model cleaner and easier to maintain.
Assets are the industrial objects
An asset is the real-world object users care about operationally. That can be a plant, a production line, one machine, one station, a subsystem, or another meaningful equipment grouping.
Assets can be nested, and this hierarchy is one of the most useful parts of the feature. A plant can contain lines, a line can contain machines, and a machine can contain subassemblies or sensor groups. The point is not only structural neatness. The hierarchy becomes a navigation and interpretation aid across the platform.
Asset links make the model operational
An asset becomes truly useful once it is linked to resources. This is what turns the model from documentation into active platform context.
In the current platform, assets can link to resources such as adapters, pipelines, datasets, charts, dashboards, and data streams. Once linked, those resources can be discovered in asset context instead of only through their technical names.
Start from the asset overview
Open Assets from the main navigation to reach the overview. The overview lists the root asset models stored in the system. From there you can create new asset models, open them, edit them, manage permissions, or delete them.
The overview is intentionally simple. The interesting structure appears once you open one asset model and begin to navigate or edit its hierarchy.
Asset Editor
Create the asset model before you fill in the details
Creating a new asset starts by creating a new root model. Open Assets, click New asset, and StreamPipes creates a root asset that becomes the starting point for the hierarchy. After the creation dialog closes, the editor opens so you can complete the actual structure.
The important mental shift is that the root asset is usually not the most detailed object. It is the top of one meaningful industrial structure. For one organization that might be a whole plant. For another it might be one production line. The right choice depends on how users should navigate the system later.
Work with the two asset screens deliberately
Assets have a view mode and an edit mode, and they serve different kinds of work.
The view screen is for consumption. It shows the selected asset or subasset together with its descriptive metadata, location information, and linked resources. This is the screen users open when they want to understand context.
The edit screen is for modeling. It shows the hierarchy on the left and the details of the selected asset on the right. This is where the structure, metadata, location assignments, and links are maintained.
Keeping these roles separate is useful because it prevents the asset model from feeling like an editing form all the time. Users who only want to browse context can stay in view mode.
Build the hierarchy first
The hierarchy editor on the left side of the edit view is one of the most important parts of the whole asset feature. It is not only a navigation tree. It is the structural definition of the industrial model.
Create the root asset
Start with the top-level industrial object that should anchor the model, such as a plant or one production line.
Add subassets where users think in real life
Add child assets such as machines, stations, or subsystems below the root so the structure mirrors operational reality.
Select one node at a time
Use the left tree to select the asset you want to edit and then maintain its details on the right side of the screen.
Save the whole model
Changes to the hierarchy are part of the full asset model and are only persisted once the asset is saved.
This means the tree should be designed around how users understand the equipment. If a packaging line is normally thought of as Filler, Capper, and Labeler, that is a sensible structure. If maintenance teams think first in terms of subsystems such as Pump System and Dosing Unit, the subasset structure should reflect that.
One practical detail matters here: the current UI distinguishes between the root asset and nested assets, and some settings such as site assignment are handled at the root level.
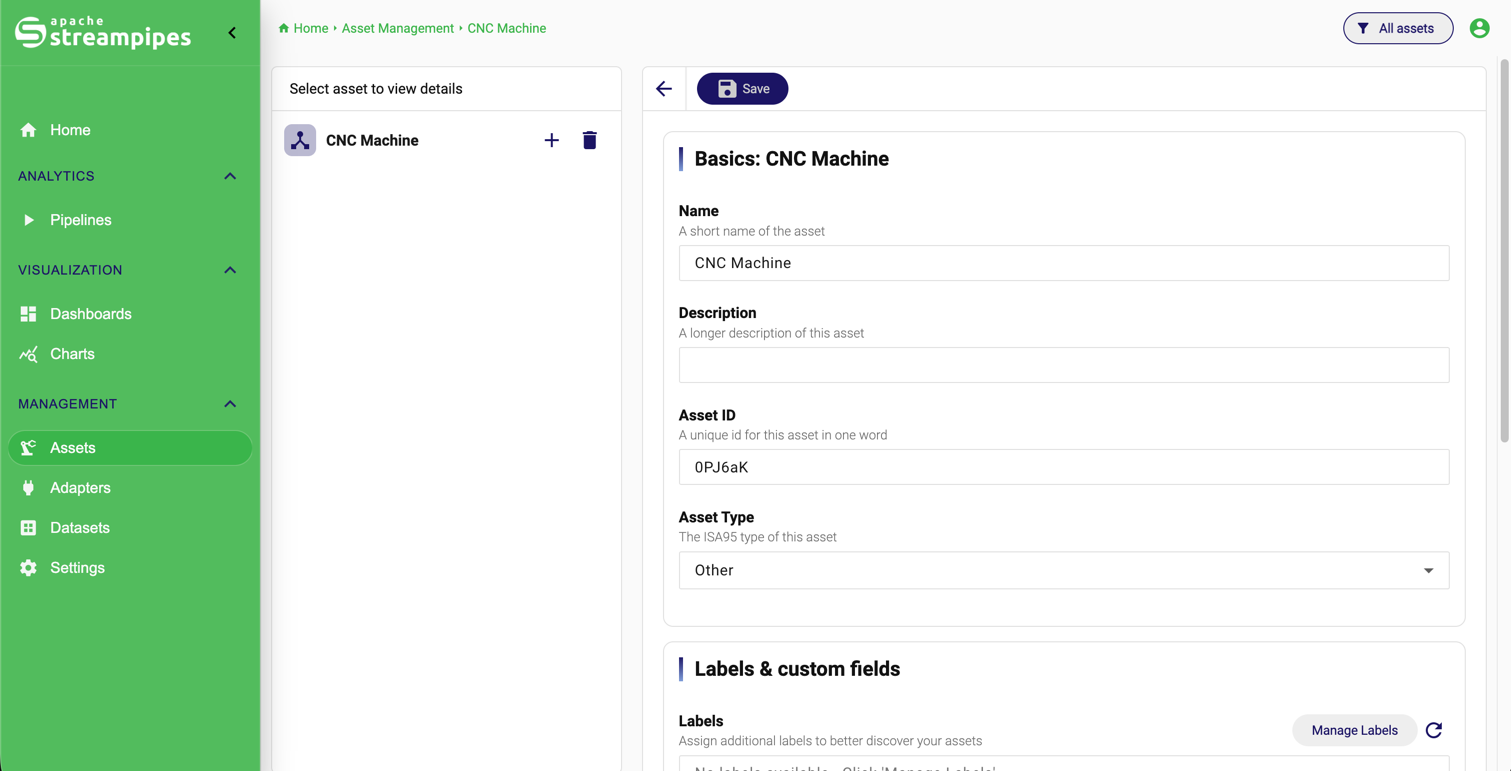
Fill in the asset basics as stable identity, not as decoration
On the right side of the editor, the Basics section captures the selected asset’s identity: Name, Description, Asset ID, and Asset Type.
These fields should be treated as operational identifiers, not as cosmetic labels. The name should be the short identity users recognize immediately. The description should explain the object in one or two helpful sentences. The asset ID should be stable and usually align with whatever internal naming or external equipment convention your organization already uses.
The asset type helps make the structure readable at scale. Because the UI uses ISA-95-oriented categories, choosing the correct type improves consistency and helps other users interpret the model faster.
Use labels and custom fields for domain context
The basics area also supports Labels & custom fields. These are most useful when the standard asset fields are not enough to express the local domain context.
Labels are good for lightweight tags such as critical, testbench, or maintenance-zone. They help with interpretation and filtering without introducing a rigid data model.
Custom fields are better when the information is structured and should remain explicit over time, for example vendor, serial number, commissioning date, or a CMMS reference. If every machine needs a supplier code or maintenance owner, custom fields are a better fit than putting that information into the description text.
Assign reusable site and area context
Site assignment happens in the Sites section of the asset editor. Open the root asset, select the site from the dropdown, choose an area if the site defines one, and save the model.
This is the point where the asset stops being only an equipment object and becomes part of the larger plant context. Because sites are shared definitions, you do not need to recreate that context for every asset manually.
The UI also includes a Manage Sites action and a refresh action for the site list. That makes it possible to switch directly to the central site configuration when the required location does not exist yet.
Add an exact location only when precision matters
In addition to the shared site assignment, the current UI can store an exact location for an asset. This is useful when an individual asset needs more precise positioning than the site alone provides.
The distinction is simple but important. The site gives reusable general location context. The exact location gives the position of one specific asset. If you do not need that precision, the site is often enough. If you do need it, enable Add exact location, define it in the location editor, and save the asset.
This is a good example of how the model stays flexible. Not every machine needs a precise map point. But the ones that do can have one without forcing the same detail level onto every other asset.
Site Assignment and Asset Links

Link resources once the model is meaningful
The Asset links section is what makes the asset model valuable across the rest of StreamPipes. In edit mode, you can add one link at a time or open the broader link-management flow when several resources should be attached together.
This is where a machine asset can become the entry point for its adapter, its persisted dataset, the chart showing its current behavior, the dashboard used by operators, and the pipeline computing KPIs from its stream.
A useful linked machine asset
One compressor asset may link to the adapter that ingests its data, the dataset storing its history, a chart for current pressure, a dashboard used in operations, and a pipeline that derives efficiency KPIs. Once these links exist, users can navigate from the machine to everything that matters around it.
In view mode, the Linked Resources section presents these connections directly. If nothing has been linked yet, the UI makes that explicit instead of pretending the absence of context is meaningful.
Use assets as the navigation backbone
The real strength of assets appears when the model is used beyond the asset screen itself. Properly linked assets become navigation context for adapters, pipelines, datasets, charts, dashboards, and asset-centric views. Instead of searching manually for the right dashboard or dataset, a user can begin from the industrial object and move outward from there.
This is the point where the feature starts to feel less like metadata management and more like a practical part of the user experience.
Permissions and deletion
Assets support permission management directly from the overview. Use Manage permissions when different teams should see or edit different parts of the asset model. This matters especially in shared installations where one industrial structure may belong to several organizational groups.
Deletion should be treated carefully because an asset may contain hierarchy and several linked resources. In practice, it is usually worth reviewing the structure and links before deleting the model entirely.
How to work well with assets and sites
The cleanest working style is to model the industrial hierarchy first, assign site context second, and link technical resources third. That order tends to produce the most coherent result because the structure exists before the individual platform objects are attached to it.
The most common mistake is to build many useful charts, datasets, and dashboards but leave them unlinked. In that situation, StreamPipes still works, but much of the contextual value of the platform is lost. Assets are what turn those isolated resources into something users can navigate naturally.