Security & User Management
Introduction
The Security section in StreamPipes is where administrators manage who can access the platform, which roles they receive, and how platform resources are shared. It combines account management, role-based access control, group assignment, service accounts, and JWT signing support in one place.
It is best read together with General Settings, where self-registration and default roles are configured, and with Environment Variables, where the installation-time security settings live.
Security Overview
What the Security page contains
The page is structured around five areas that reflect how access control actually works in operation. User Accounts and Service Accounts define who or what authenticates. Groups and Roles define how permissions are bundled and assigned. Authentication covers the technical material used for token signing and related trust configuration. Read together, these sections describe both the human and the technical side of platform access.
Security model at a glance
In practice, StreamPipes combines three layers. Accounts identify users or services. Roles define what those accounts are generally allowed to do. Resource permissions decide who may access one specific adapter, pipeline, chart, dashboard, dataset, asset, or extension. That distinction matters because a user can have the correct global role and still not see a concrete resource until that object has been shared explicitly.
Installation-time security settings
Before you start managing users in the UI, review the security-related environment variables of the installation. The most important installation-time settings are:
SP_INITIAL_ADMIN_EMAILSP_INITIAL_ADMIN_PASSWORDSP_INITIAL_SERVICE_USERSP_INITIAL_SERVICE_USER_SECRETSP_ENCRYPTION_PASSCODESP_JWT_SECRETSP_JWT_SIGNING_MODESP_JWT_PRIVATE_KEY_LOC
For extension services that authenticate against the core, the relevant settings are:
SP_CLIENT_USERSP_CLIENT_SECRET
For production systems, you should change the default credentials and secrets before exposing the installation to real users or connecting external systems.
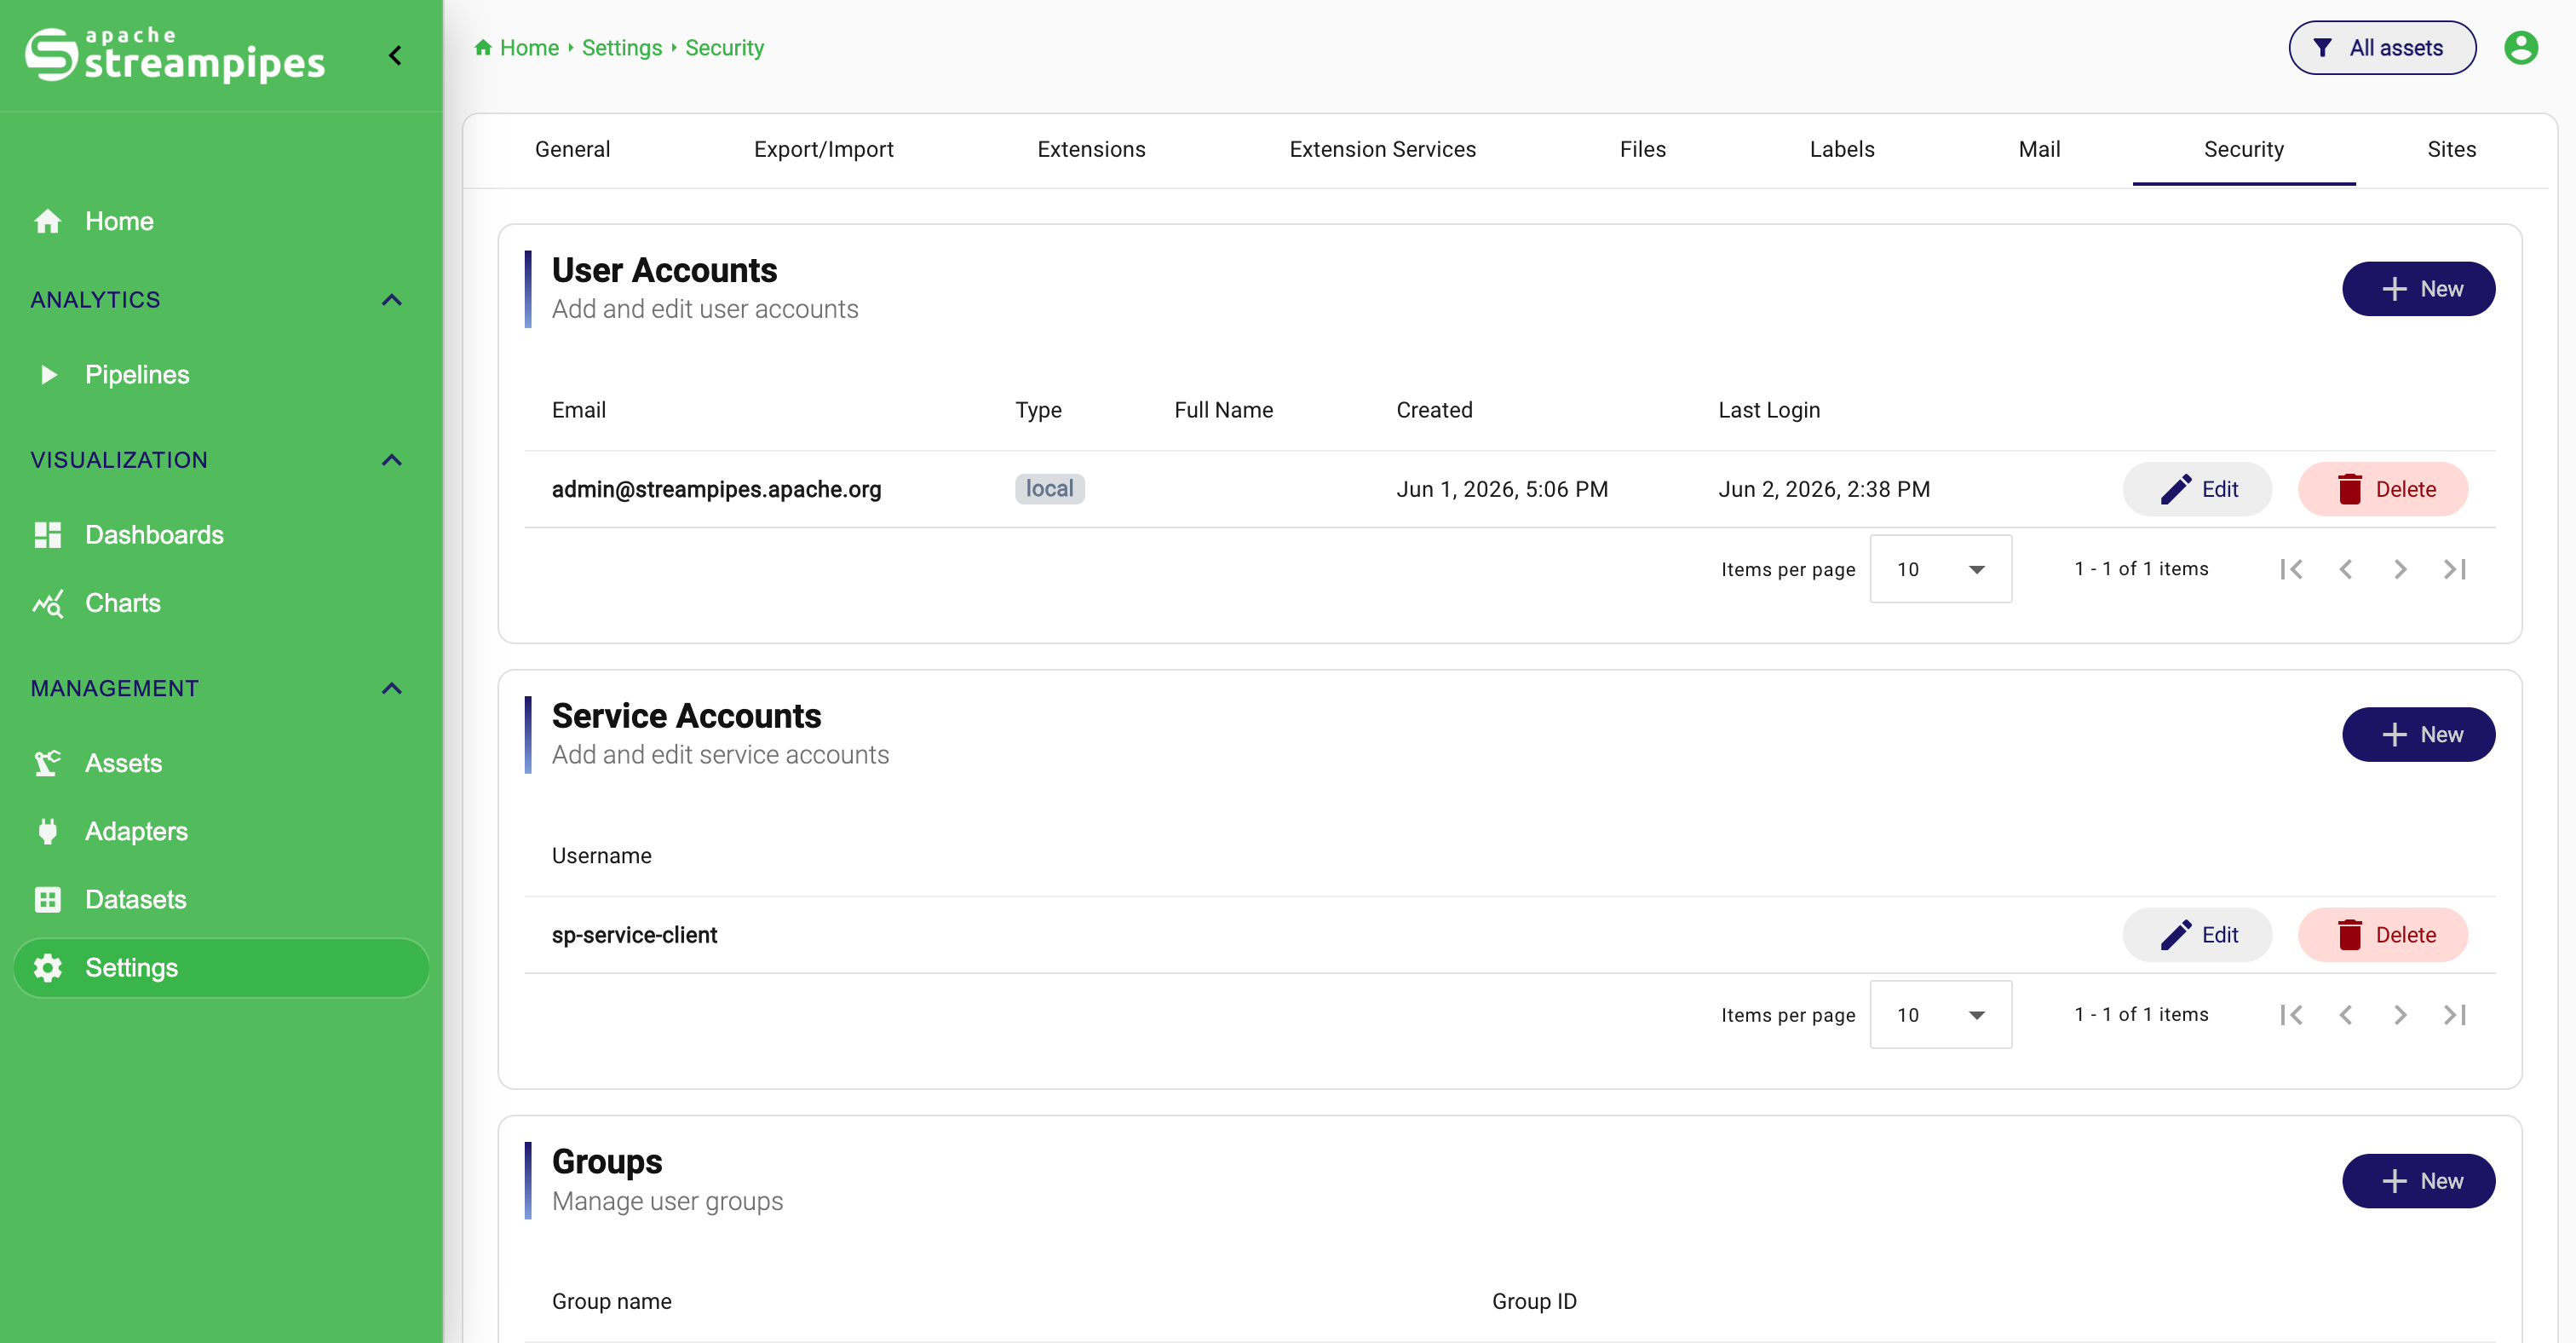
User accounts
User Accounts are the interactive identities for people who sign in through the UI or use the API as named users. The table is designed as a quick operational view: it shows who the user is, where the identity comes from, when the account was created, and when it was used last. In daily administration, that is usually enough to answer the first questions immediately: Is this a local or external user, and is the account still active in practice?
Create a user account
To create a local user:
- Open
Configuration>Security. - In
User Accounts, clickNew. - Enter the user's email address and full name.
- In
Password, either enter an initial password or, if email is configured, enableAuto-create password and send to user. - Assign groups and roles.
- Decide whether the account should be
Enabledand whether it should beLocked. - Click
Save.
Edit a user account
Editing a local user is where identity and authorization come together. You can update the email address and full name, adjust direct role assignments, add or remove groups, and change whether the account is enabled or locked. If you change the email address of the currently signed-in user, StreamPipes requires a new login afterwards, which is operationally sensible because the signed-in identity itself has changed.
External users
StreamPipes can also show users that come from an external identity provider. In the table, these users are marked by their provider instead of local.
These accounts should be read differently from local ones. Identity fields are owned by the external system, parts of the form can therefore become read-only, and role information may also be mapped from the provider depending on the installation model. The UI makes that distinction explicit so administrators do not mistake an external identity for a normal local user that simply happens to be missing some fields.
Edit a User Account

Service accounts
Service Accounts are the non-human identities used for automated communication with the core API. They are the right tool whenever access should belong to an extension service, a script, or another integration instead of to an individual person. This keeps technical access stable over time and avoids coupling long-running integrations to one employee account.
Create a service account
To create a service account:
- Open
Configuration>Security. - In
Service Accounts, clickNew. - Enter the username.
- Enter a
Client Secret. - Assign the required groups and roles.
- Click
Save.
The client secret must meet the minimum length requirement enforced by the UI. In practice, service accounts should stay tightly scoped. Give them only the roles they actually need, because they often become long-lived technical identities that are harder to notice than interactive users.
Groups
Groups are the practical answer to repeated user management. Instead of assigning the same set of roles to many individuals again and again, you define the shared role set once on the group and then assign users to that group. This is usually the cleaner model as soon as several people work in the same function or team.
Create a group
- Open
Configuration>Security. - In
Groups, clickNew. - Enter a group name.
- Select one or more roles for the group.
- Click
Save.
After that, edit users and enable the group checkboxes you want to assign.
Alternate IDs for groups
Groups also support Alternate IDs. These are especially useful in external-identity setups, because they let you keep a stable StreamPipes group with its local role definition while still mapping it to the identifier used by the upstream identity provider.
Create a Group
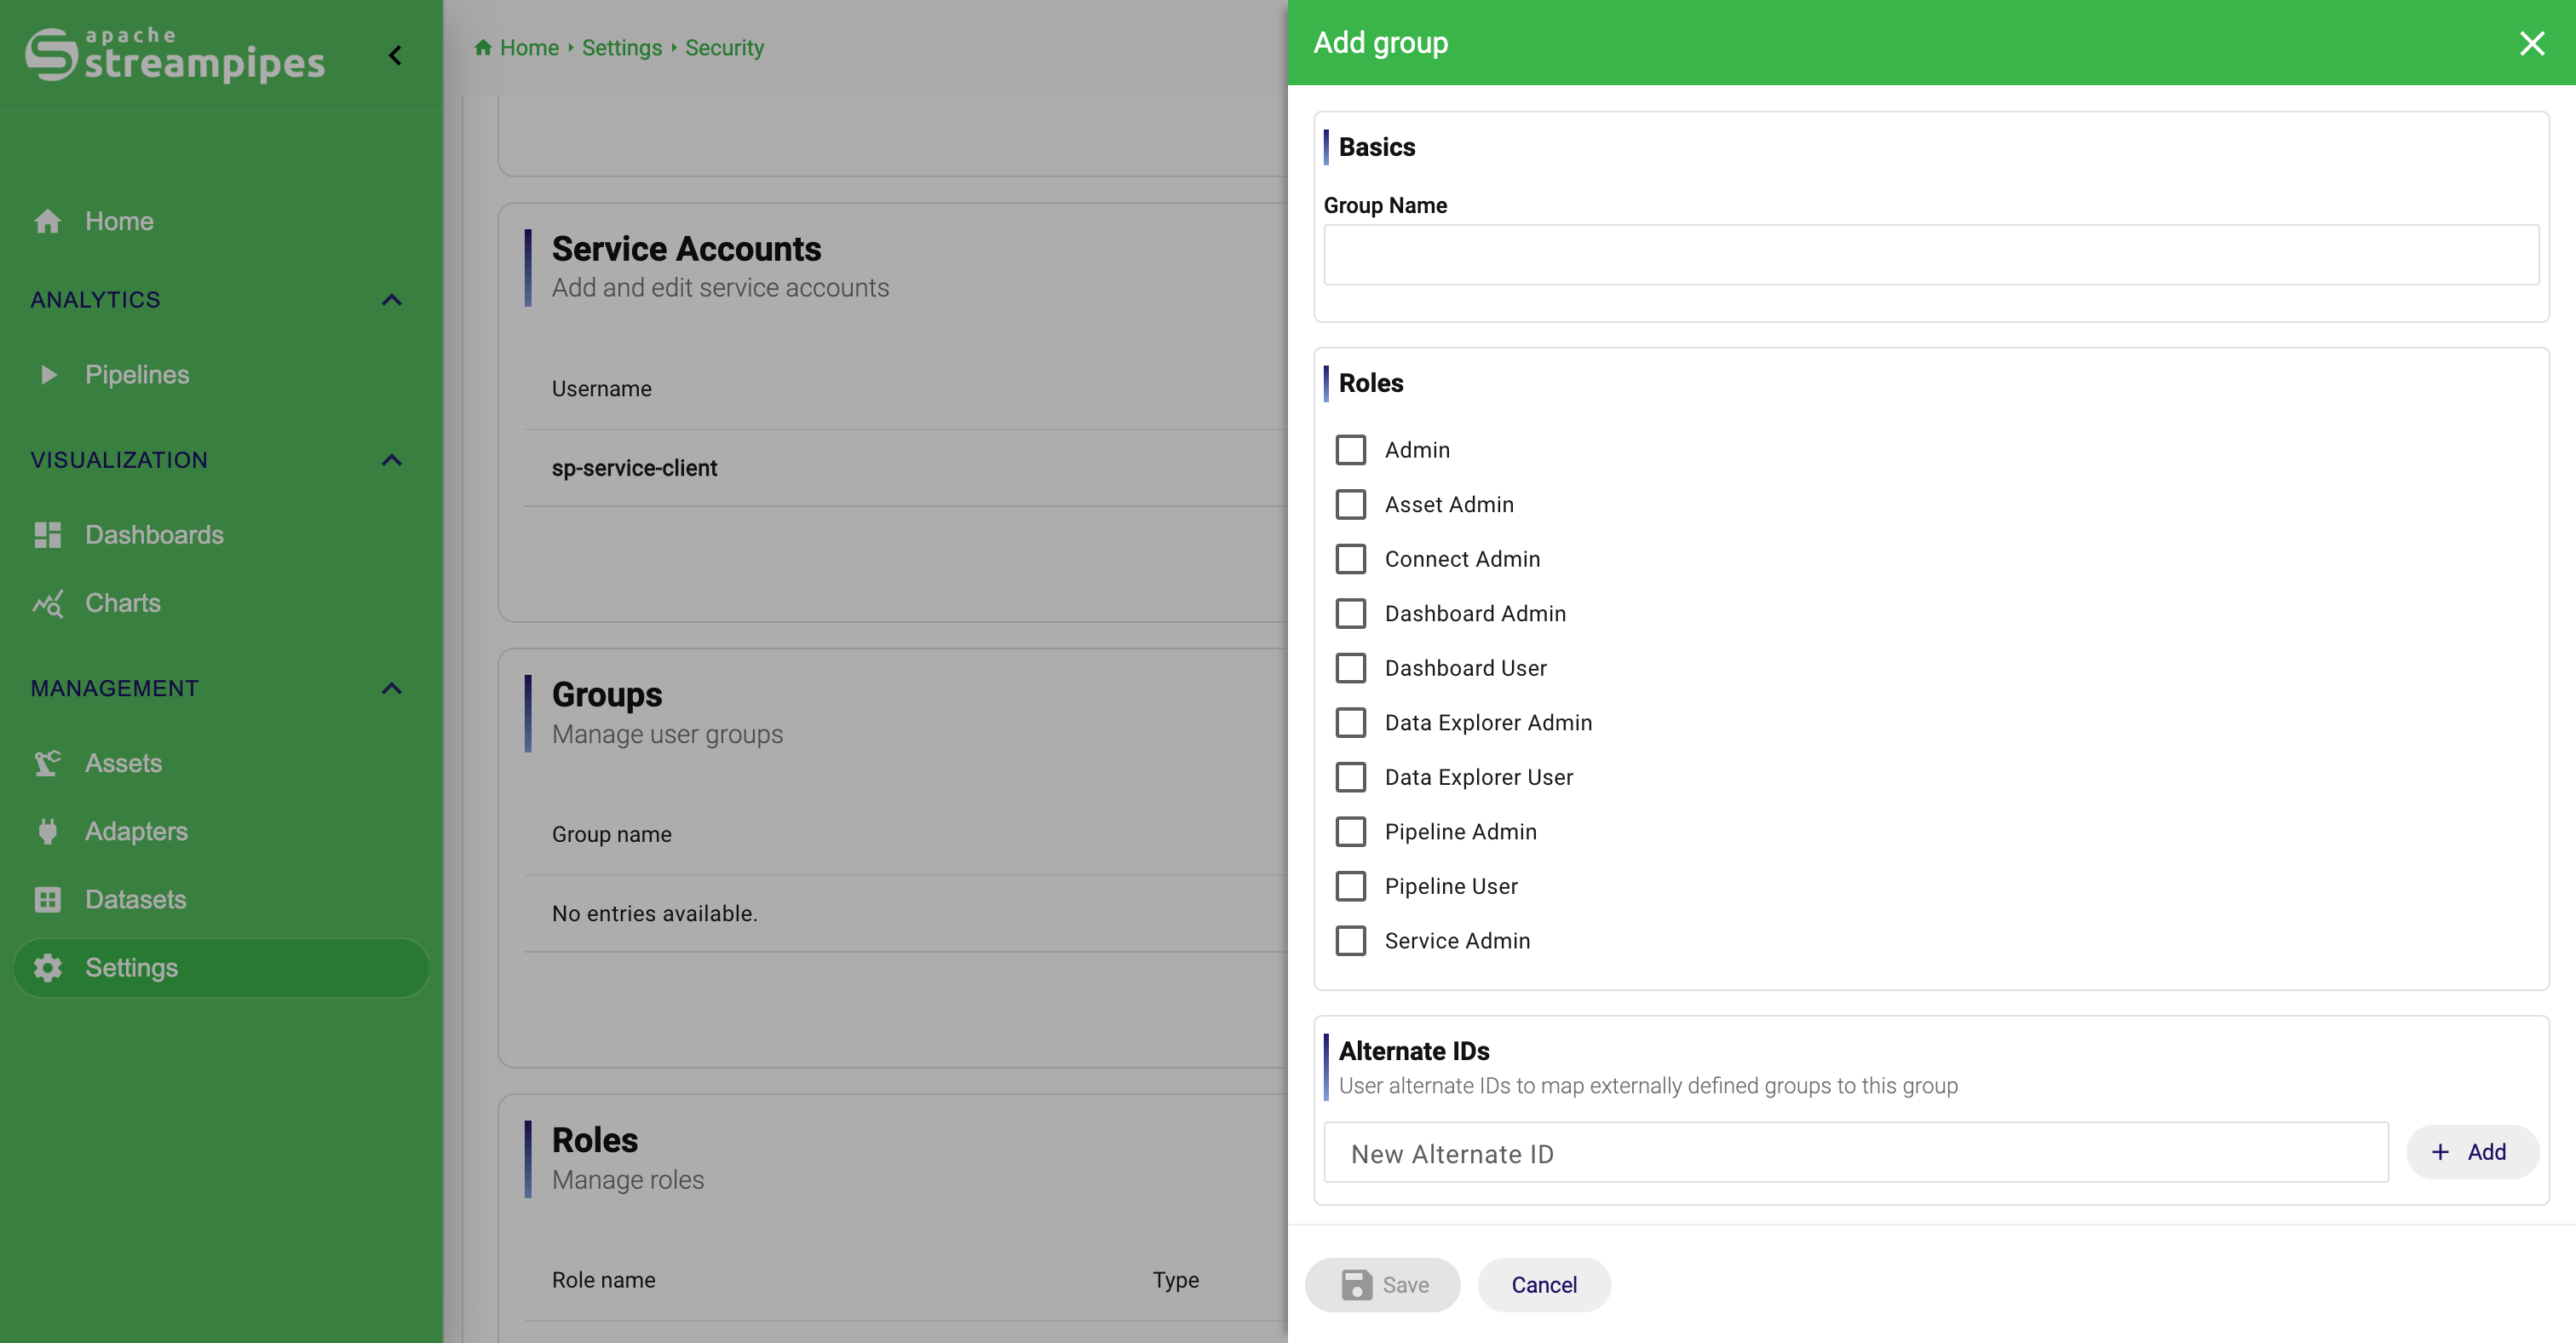
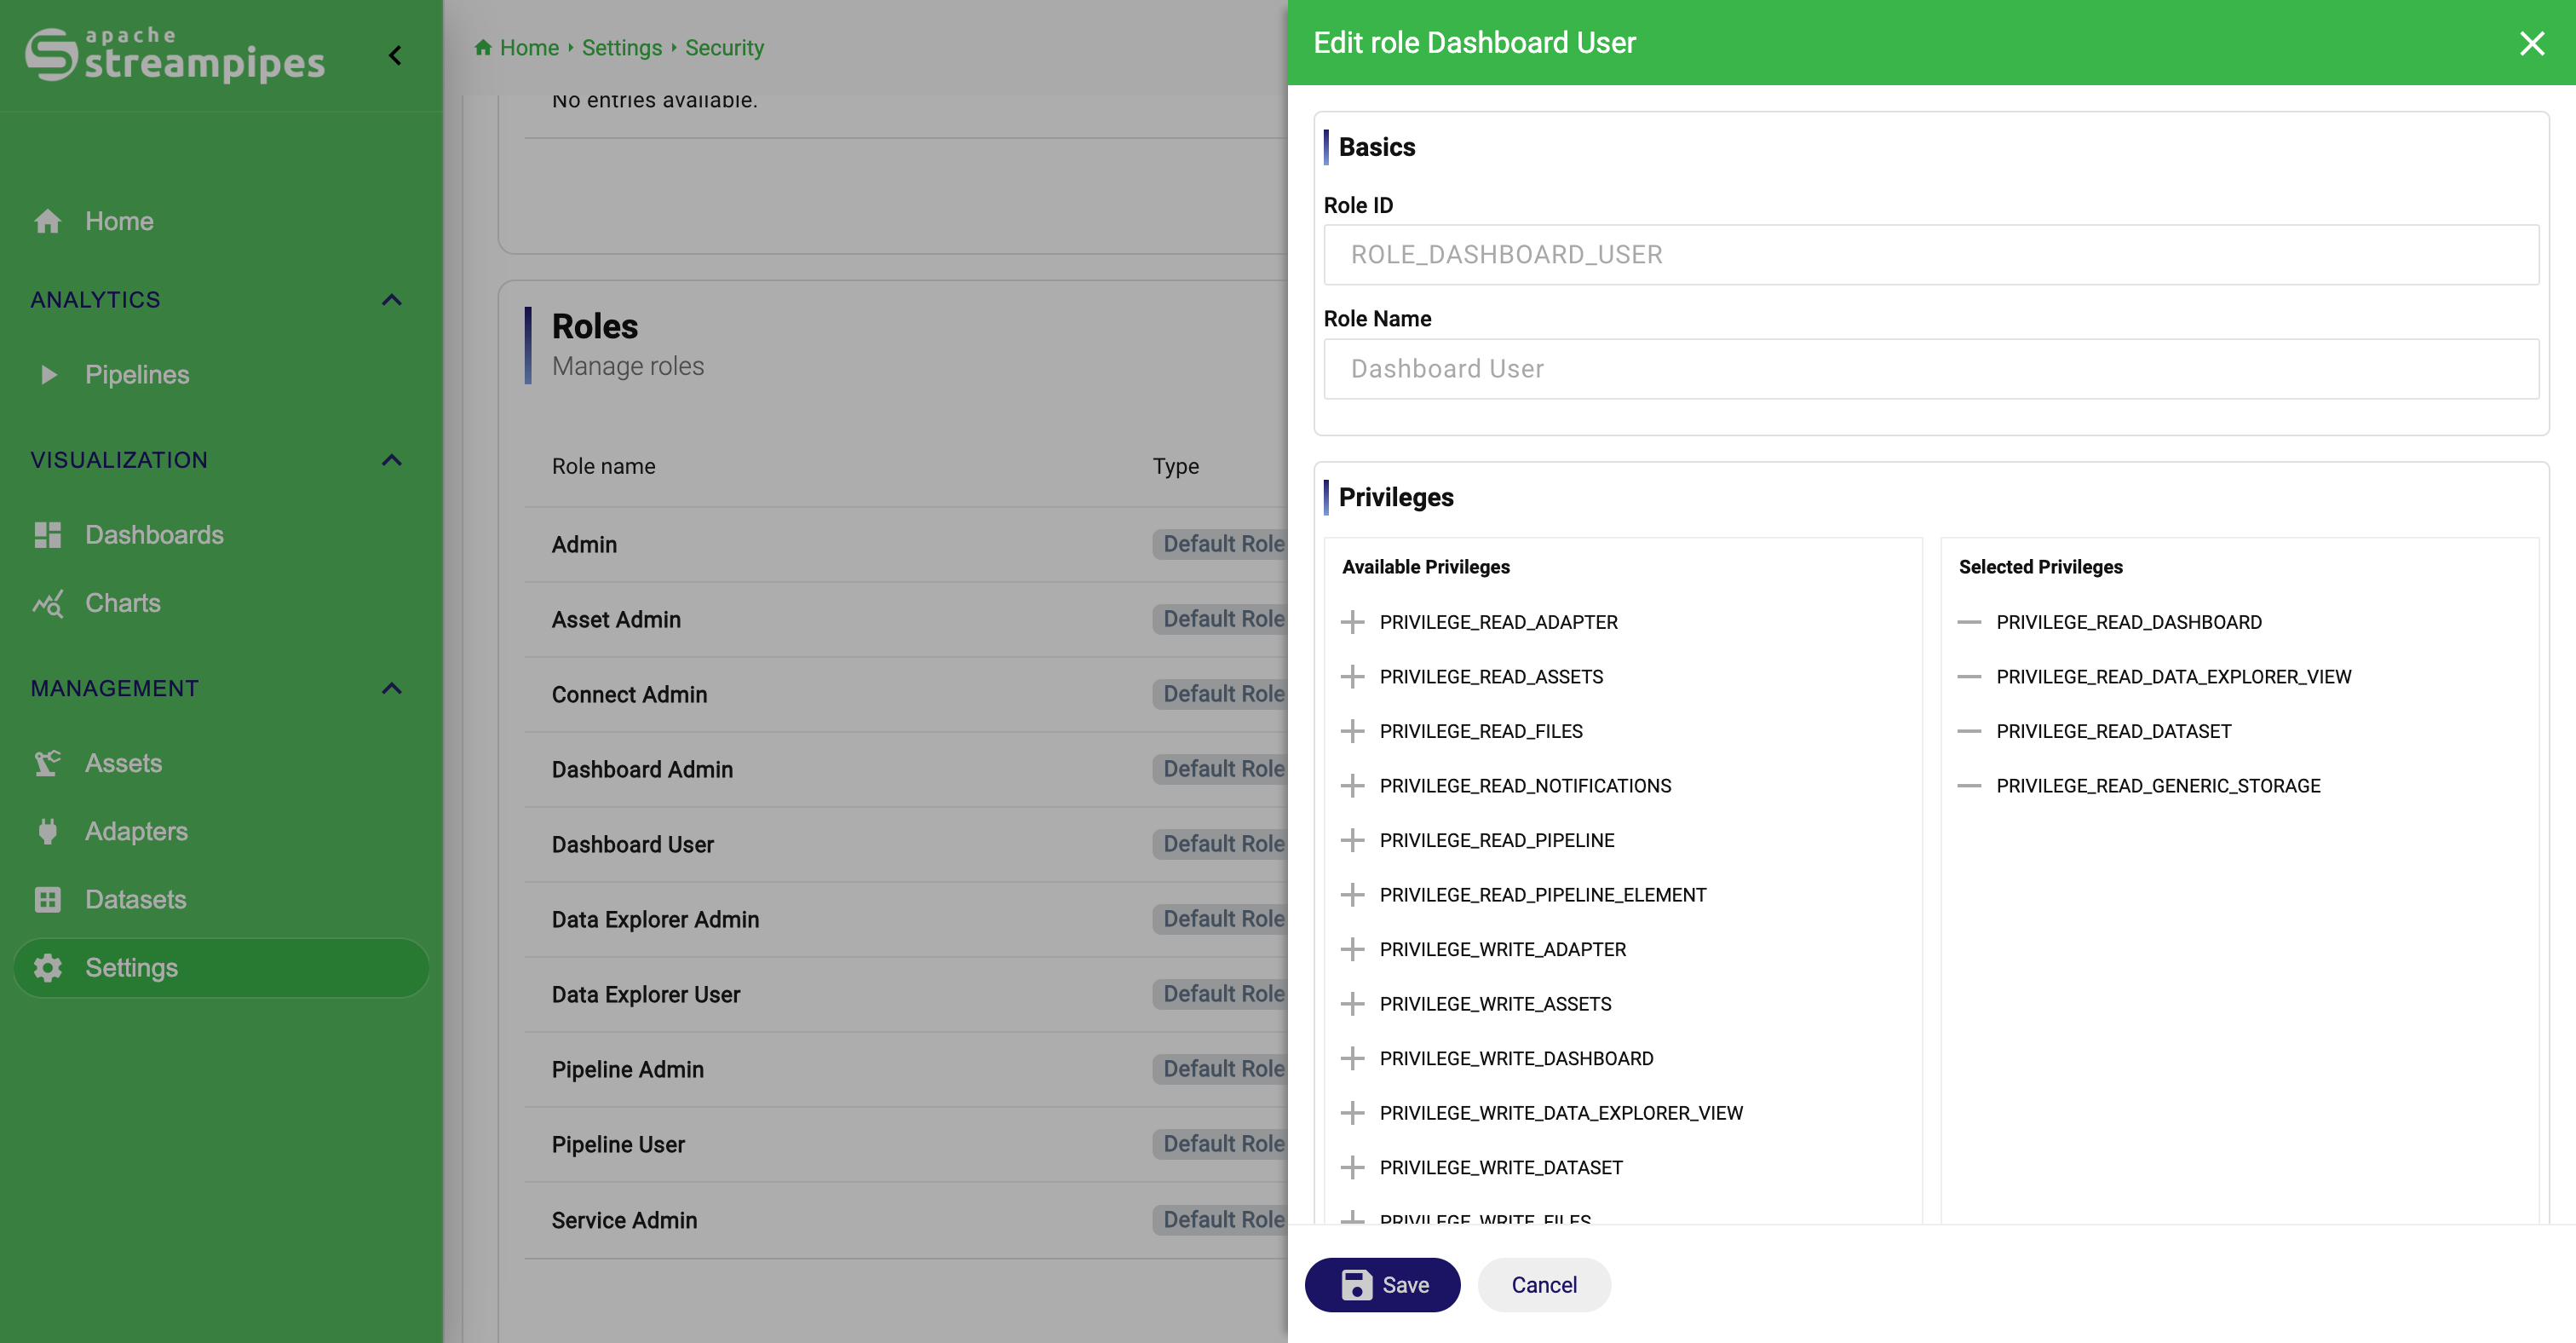
Roles
Roles are the central permission-building block in StreamPipes. A role contains a set of privileges, and those privileges become effective only when the role is assigned directly to a user or inherited through a group. The role overview therefore separates built-in default roles from custom roles created for the local operating model. Default roles remain part of the platform and cannot be deleted.
Create a custom role
- Open
Configuration>Security. - In
Roles, clickNew. - Enter a
Role ID. - Enter a
Role Name. - Add the required privileges from
Available PrivilegestoSelected Privileges. - Optionally add
Alternate IDsif the role should map to externally defined roles. - Click
Save.
The role ID must start with ROLE_ and use only uppercase letters and underscores.
Alternate IDs for roles
Like groups, roles can also carry Alternate IDs. This is the bridge between externally named roles and the local StreamPipes authorization model. It allows the local model to remain stable even when the upstream provider uses different names or identifiers.
Roles and Effective Authorization Inputs
Assign Roles Through Groups
Define the Role Privileges
How users, groups, and roles work together
The effective permissions of a user are the combination of direct role assignments and the roles inherited from assigned groups. That is why groups should be seen as a role-assignment mechanism, not as a second permission system. In most real installations, the cleanest pattern is to keep only a small number of business-oriented groups such as Operations, Data Engineering, or Plant Supervisors, attach the relevant roles there, and rely less on large numbers of direct per-user assignments.
Resource permissions
Roles control what a user is allowed to do in general. Resource permissions decide which concrete objects that user or group can actually access. This model is used across the major resource types, including adapters, pipelines, datasets, charts, dashboards, assets, and extensions.
How resource permissions work
Each resource has an owner, a visibility model such as private or shared access, and explicit assignments in its permissions dialog. This allows StreamPipes to separate two decisions that should remain separate: who may generally manage a type of object, and who may access one specific object of that type.
Change permissions for a resource
To change permissions, open the overview page of the corresponding resource type and use the permissions action for the item you want to manage. The exact button placement differs by feature, but the workflow is the same:
- Open the resource overview.
- Locate the item.
- Open the permissions dialog.
- Assign the required users or groups.
- Save the changes.
This is the mechanism to use when one team should see or edit a specific object without making it broadly available to everyone with the same global role.
Authentication and JWT signing
The Authentication section currently focuses on JWT Signature. In operational terms, this is the technical trust material for token-based communication. The UI can generate a new public/private key pair and make both files available for download, which is useful when signed tokens should rely on an explicit RSA key pair instead of only on a shared secret.
Generate a key pair
- Open
Configuration>Security. - Scroll to
Authentication. - Click
Generate and download new key pair. - Store the downloaded files securely.
- Update the deployment configuration so the core and dependent services use the generated keys.
The generated bundle contains public.key and private.pem. If you configure RSA-based JWT signing, the deployment must reference those files through the matching environment variables. Without that final deployment step, generating the files in the UI alone does not change the effective signing behavior of the installation.
Self-registration and default roles
User self-registration is not configured in Security itself. It lives in General Settings, where you decide whether self-registration and password recovery are allowed and which default roles newly registered users should receive. The separation is intentional. Security is where you manage concrete identities, groups, roles, and technical authentication assets. General Settings is where you define how new users enter the system in the first place.
OAuth and external identity providers
StreamPipes can be connected to external authentication providers such as Keycloak, Azure AD, or GitHub. Provider configuration is done through environment variables, not through a full provider wizard in the UI.
Enable OAuth
At minimum, enable OAuth with:
SP_OAUTH_ENABLEDSP_OAUTH_REDIRECT_URI
SP_OAUTH_REDIRECT_URI must point to the public base URL of your StreamPipes installation.
Provider configuration pattern
Every provider is configured with variables that follow this pattern:
SP_OAUTH_PROVIDER_{PROVIDER_ID}_{SETTING}
Examples:
SP_OAUTH_PROVIDER_AZURE_CLIENT_IDSP_OAUTH_PROVIDER_GITHUB_CLIENT_SECRETSP_OAUTH_PROVIDER_KEYCLOAK_ISSUER_URI
The PROVIDER_ID identifies one configured provider. Multiple providers can exist side by side by using different IDs, which makes it possible to support more than one identity source without inventing a separate configuration model for each one.
Provider-specific settings
The current OAuth configuration parser supports the following provider settings:
AUTHORIZATION_URICLIENT_NAMECLIENT_IDCLIENT_SECRETFULL_NAME_ATTRIBUTE_NAMEISSUER_URIJWK_SET_URISCOPESTOKEN_URIUSER_INFO_URIEMAIL_ATTRIBUTE_NAMEUSER_ID_ATTRIBUTE_NAMEROLE_ATTRIBUTE_NAMENAMEDEFAULT_ROLES
In practice, the most important values fall into four groups: connection details such as AUTHORIZATION_URI or ISSUER_URI, client credentials such as CLIENT_ID and CLIENT_SECRET, user-attribute mapping such as EMAIL_ATTRIBUTE_NAME and FULL_NAME_ATTRIBUTE_NAME, and optional authorization mapping through ROLE_ATTRIBUTE_NAME or DEFAULT_ROLES.
What the provider settings mean
At a practical level, NAME controls the label shown to users on the login screen, CLIENT_NAME identifies the OAuth client, and SCOPES defines which information should be requested from the provider. The attribute-mapping settings such as EMAIL_ATTRIBUTE_NAME, FULL_NAME_ATTRIBUTE_NAME, and USER_ID_ATTRIBUTE_NAME decide how StreamPipes translates external claims into a local user. ROLE_ATTRIBUTE_NAME is used when the provider sends role information directly. DEFAULT_ROLES is the fallback when authentication should succeed even without explicit external role mapping.
Example structure
The following example shows the structure of a provider configuration:
SP_OAUTH_ENABLED=true
SP_OAUTH_REDIRECT_URI=https://streampipes.example.com

SP_OAUTH_PROVIDER_AZURE_NAME=Azure
SP_OAUTH_PROVIDER_AZURE_CLIENT_NAME=streampipes
SP_OAUTH_PROVIDER_AZURE_CLIENT_ID=<client-id>
SP_OAUTH_PROVIDER_AZURE_CLIENT_SECRET=<client-secret>
SP_OAUTH_PROVIDER_AZURE_AUTHORIZATION_URI=https://login.microsoftonline.com/<tenant>/oauth2/v2.0/authorize
SP_OAUTH_PROVIDER_AZURE_TOKEN_URI=https://login.microsoftonline.com/<tenant>/oauth2/v2.0/token
SP_OAUTH_PROVIDER_AZURE_ISSUER_URI=https://login.microsoftonline.com/<tenant>/v2.0
SP_OAUTH_PROVIDER_AZURE_JWK_SET_URI=https://login.microsoftonline.com/<tenant>/discovery/v2.0/keys
SP_OAUTH_PROVIDER_AZURE_USER_INFO_URI=https://graph.microsoft.com/oidc/userinfo
SP_OAUTH_PROVIDER_AZURE_SCOPES=openid,profile,email
SP_OAUTH_PROVIDER_AZURE_EMAIL_ATTRIBUTE_NAME=email
SP_OAUTH_PROVIDER_AZURE_FULL_NAME_ATTRIBUTE_NAME=name
SP_OAUTH_PROVIDER_AZURE_USER_ID_ATTRIBUTE_NAME=sub
If you define more than one provider, keep SP_OAUTH_ENABLED and SP_OAUTH_REDIRECT_URI once, and add one provider block per identity provider.
Role mapping in OAuth-based setups
OAuth-based installations can combine several mechanisms at once: DEFAULT_ROLES in the provider configuration, ROLE_ATTRIBUTE_NAME when the provider sends role claims directly, and Alternate IDs on groups or roles in the Security page. The clean mental model is to use provider configuration for authentication and claim mapping, and to keep the local StreamPipes roles and groups as the understandable authorization layer. In that model, alternate IDs are simply the bridge between both worlds.
Recommended operating pattern
For most teams, the most reliable model is simple: set secure initial credentials during deployment, create dedicated service accounts for technical integrations, use groups for team-level assignment, keep custom roles small and purpose-specific, and use resource permissions for sharing individual objects. In OAuth-based installations, add one more habit: review the resulting users and mappings in the Security page instead of assuming the external provider configuration already tells the full story.