Pipelines as Code
In Apache StreamPipes, pipelines represent the flow of data from sources (streams), through processors (filters, transformations, etc.), and finally to sinks (third-party-systems, storage, notifications). Traditionally, pipelines are created through the web-based user interface. However, they can also be defined programmatically as code, offering the flexibility to manage pipelines using Infrastructure as Code (IaC) practices.
This guide explains how to define and create pipelines programmatically using a YAML structure.
Introduction
Defining pipelines as code allows you to automate the creation, management, and deployment of StreamPipes pipelines. This is especially useful for managing multiple StreamPipes instances across environments. Pipelines are written in a YAML format (or alternatively as JSON) and can be deployed programmatically via the StreamPipes REST API.
This guide provides an overview of how to structure pipeline definitions in YAML and deploy them using the API.
Pipeline YAML Structure
A pipeline in YAML consists of several key sections:
- ID: A unique identifier for the pipeline.
- Name and Description: Optional fields to describe the pipeline.
- Pipeline Elements: The components that make up the pipeline, including streams (data sources), processors (data transformations), and sinks (output destinations).
- Create Options: Specifies how and when to start the pipeline (e.g.,
start: falsemeans the pipeline won't start automatically).
Here’s a high-level breakdown of the structure:
id: my-pipeline
name: ""
description: ""
pipelineElements:  # Define pipeline components here
  - type: stream     # Data source
    ref: <reference> # Unique reference ID
    id: <data-stream-id> # ID of the stream

  - type: processor  # Data transformation
    ref: <reference> # Unique reference ID
    id: <processor-id> # ID of the processor
    connectedTo:     # Previous pipeline element reference(s)
      - <reference>
    configuration:   # Processor-specific configurations
      - <configuration-option>

  - type: sink       # Data sink (output)
    ref: <reference> # Unique reference ID
    id: <sink-id>    # ID of the sink
    connectedTo:     # Previous pipeline element reference(s)
      - <reference>
    configuration:   # Sink-specific configurations
      - <configuration-option>

createOptions:
  start: <true|false>  # Whether to start the pipeline immediately
Pipeline Elements
Building blocks
The key building blocks of a pipeline include:
Stream
A stream represents a data source in the pipeline, such as a sensor feed, API, or message queue. It is referenced by a unique ID that identifies the data stream.
Processor
A processor transforms, filters, or enriches the data coming from a stream or another processor. Each processor has configuration parameters that control its behavior, such as filtering criteria or mapping options.
Sink
A sink sends the processed data to a final destination, such as a database, file storage, or another service. Sinks may also have configuration options that specify where and how the data should be sent.
A pipeline element is selected by providing its ID. For processors and sinks, the ID refers to the appId of the pipeline element, e.g., org.apache.streampipes.processors.filters.jvm.numericalfilter.
For data streams, the ID refers to the elementId of the data stream.
To define connections between pipeline elements, the ref and connectedTo fields can be used.
ref can be a short string (e.g., stream01 or processor01) which will be used as an internal identifier of the pipeline element.
Within the connectedTo list, connections to other pipeline elements can be defined.
Each item of the list should relate to an existing ref.
Configuration
In the configuration section, which only applies for data processors and sinks, the pipeline element configuration can be applied.
The configuration options depend on the pipeline element and have the same structure as the adapter configuration (see Adapters as Code)
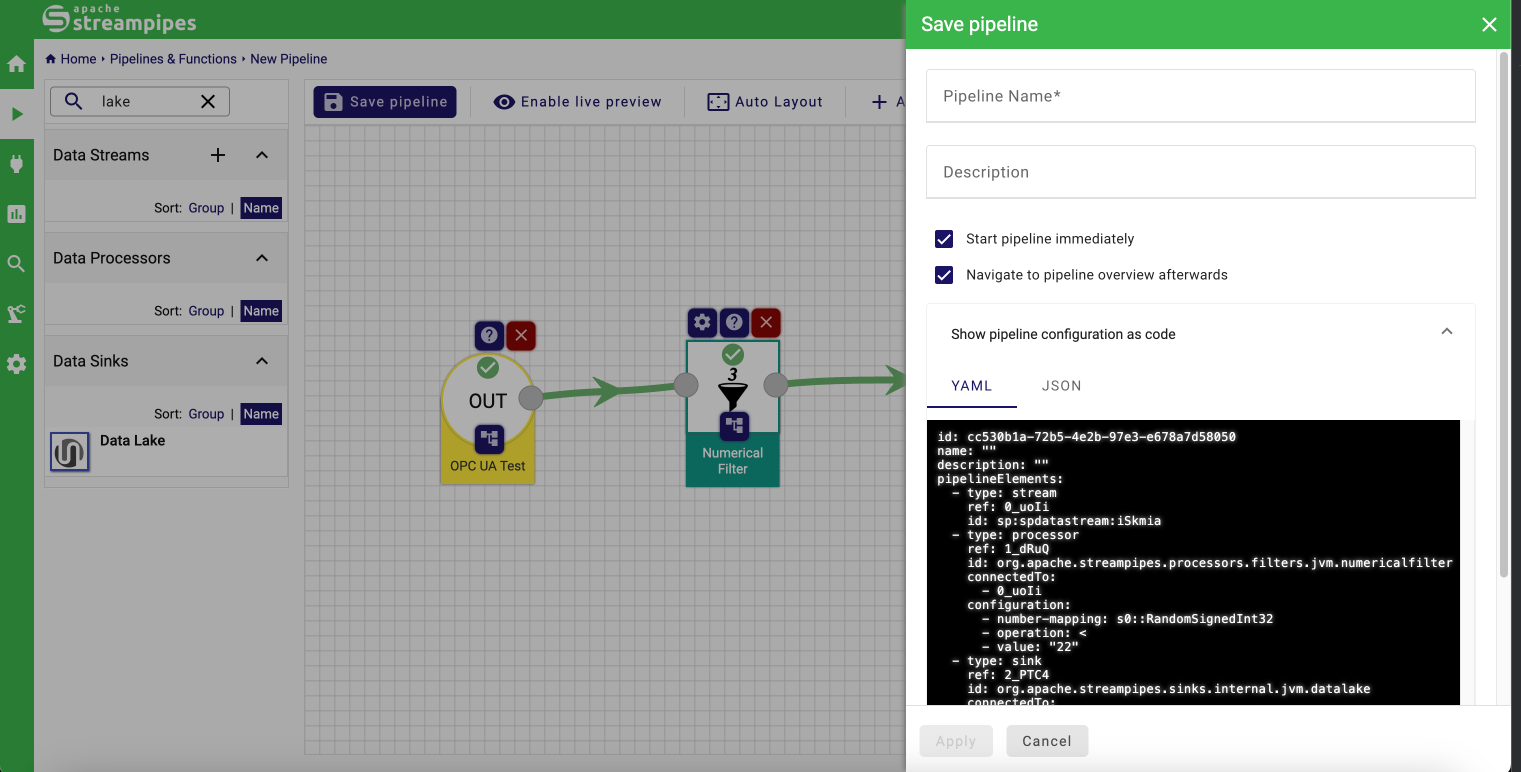
The easiest way to determine a valid configuration is the web interface.
After creating a pipeline in the web interface and clicking on Save pipeline, the option Show pipeline configuration as code shows the current pipeline configuration in YAML or JSON format:

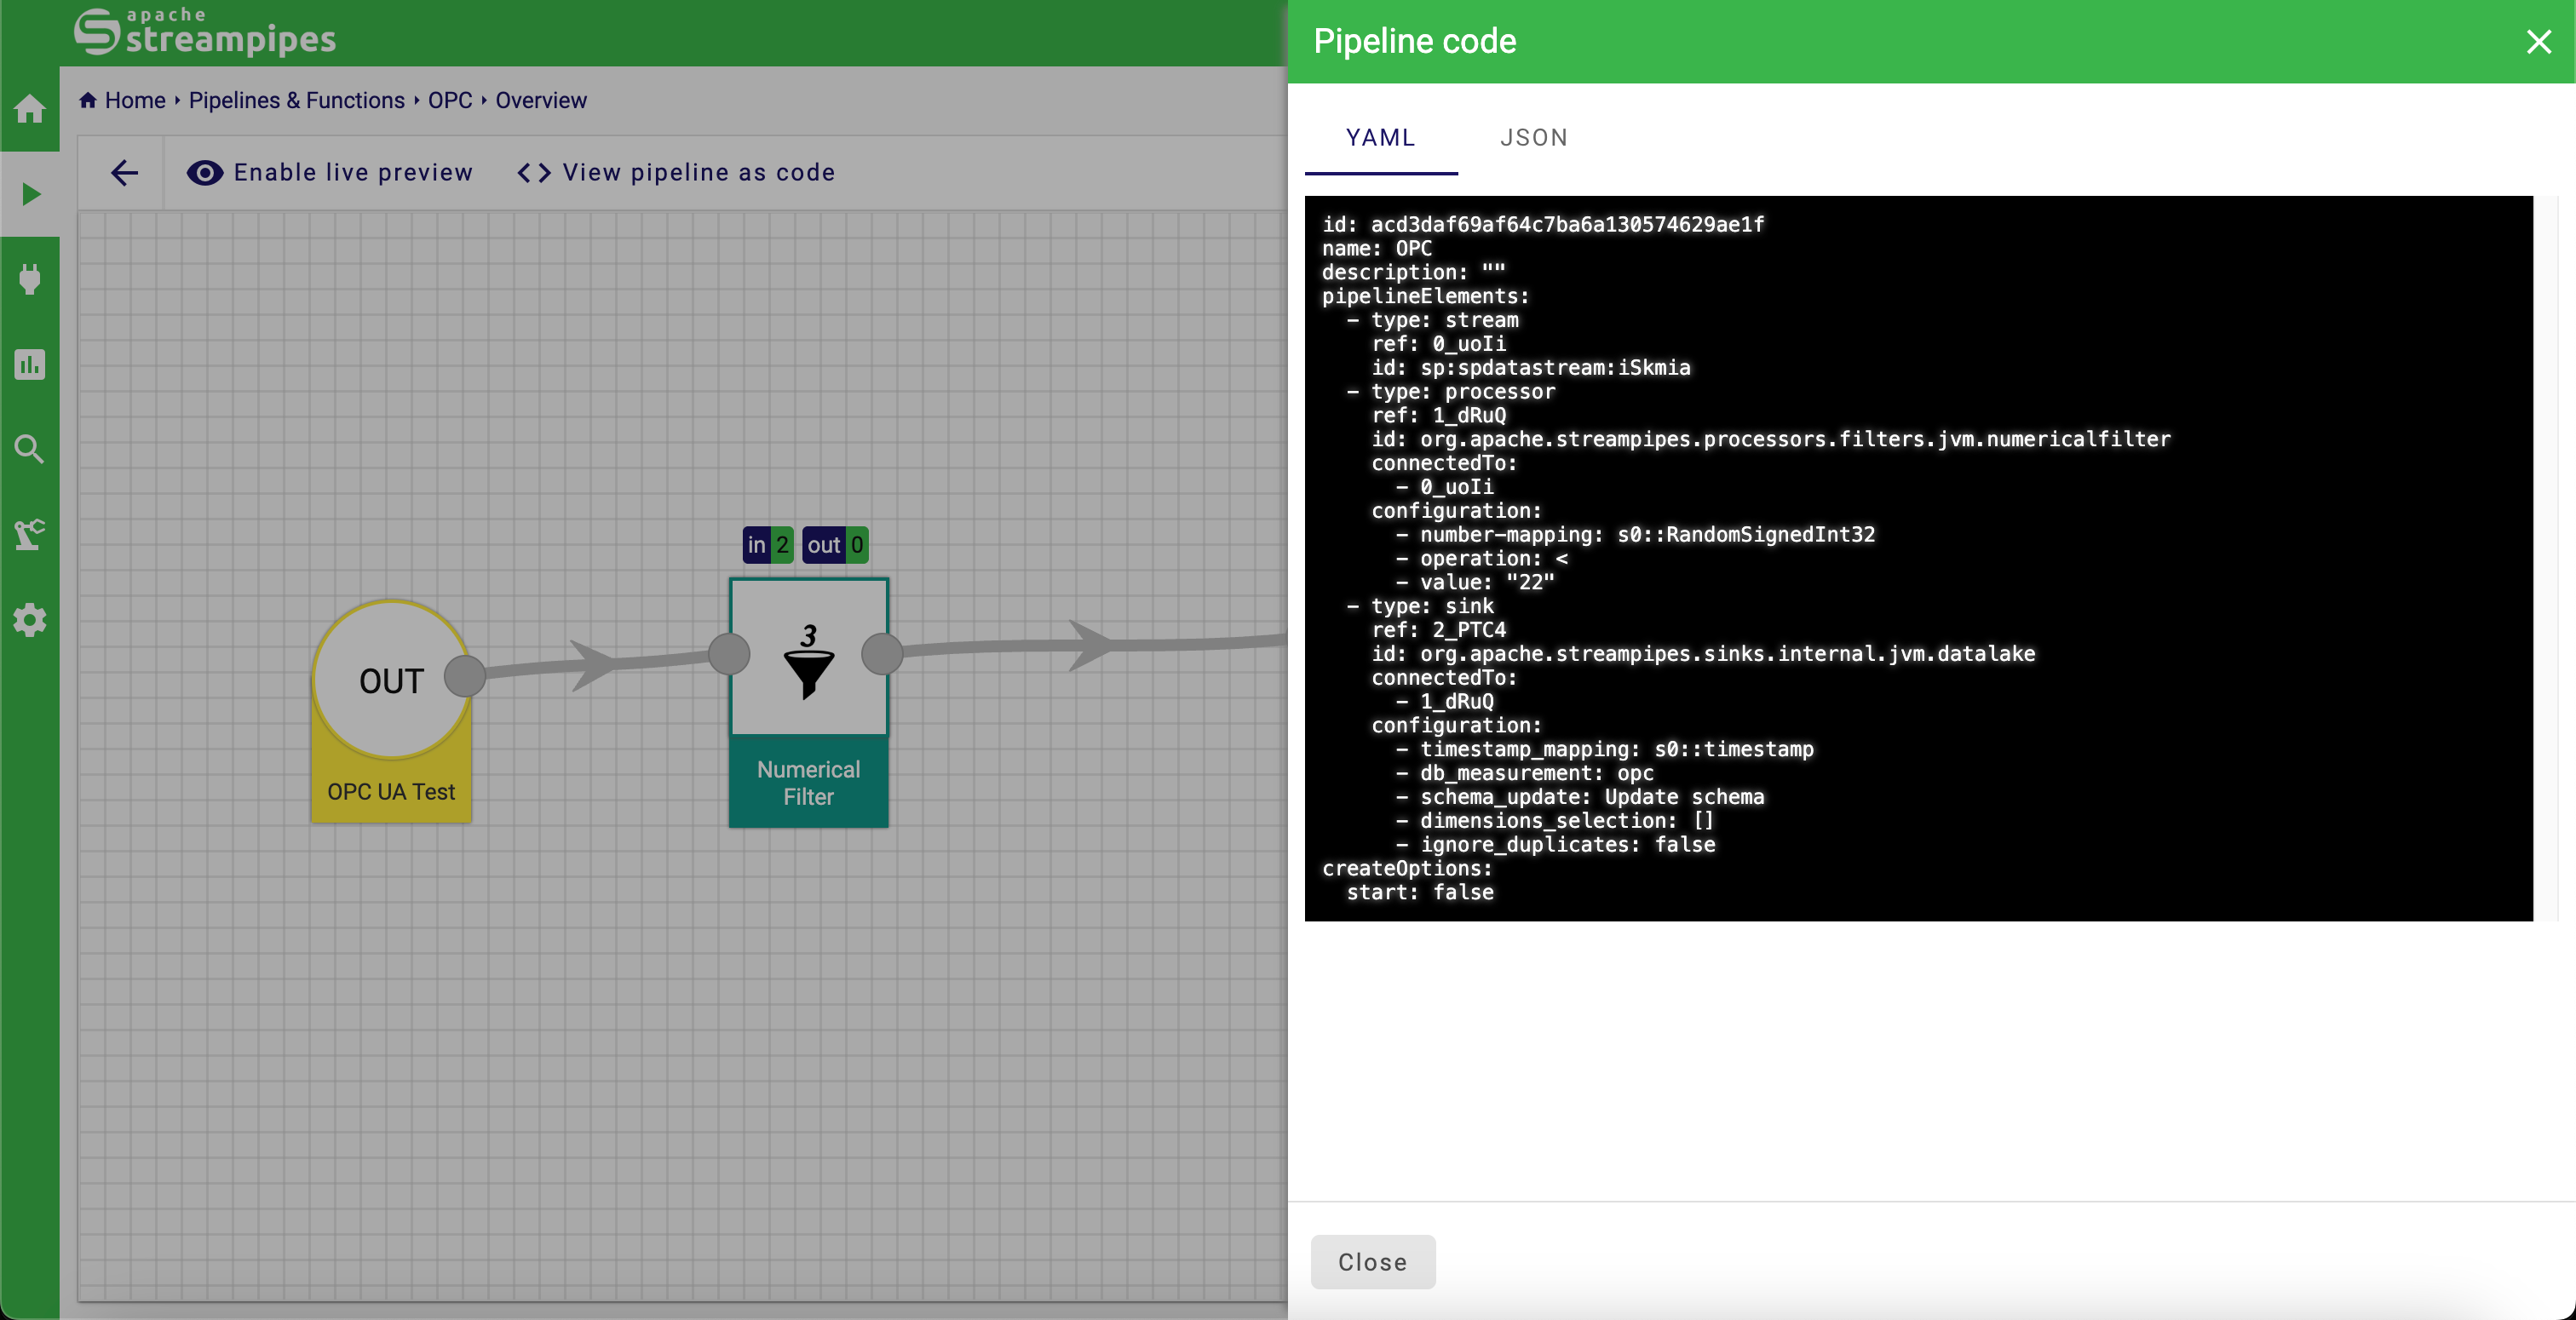
Another option is to view the pipeline details for an existing pipeline. Here, the YAMl definition of the pipeline can be viewed by clicking the View pipeline as code button:

Example pipeline as Code
Here's an example of a pipeline written in YAML format:
id: my-pipeline
name: "Density Filter Pipeline"
description: "A pipeline that filters data based on the density and stores it in a data lake."
pipelineElements:
  - type: stream
    ref: stream01
    id: sp:spdatastream:GWWzMD
  - type: processor
    ref: processor01
    id: org.apache.streampipes.processors.filters.jvm.numericalfilter
    connectedTo:
      - stream01
    configuration:
      - number-mapping: s0::density
      - operation: <
      - value: "12"
  - type: sink
    ref: sink01
    id: org.apache.streampipes.sinks.internal.jvm.datalake
    connectedTo:
      - processor01
    configuration:
      - timestamp_mapping: s0::timestamp
      - db_measurement: my-measurement
      - schema_update: Update schema
      - dimensions_selection:
          - sensorId
      - ignore_duplicates: false
createOptions:
  start: false
Stream: The pipeline begins with a data stream (sp:spdatastream:GWWzMD) referenced by stream01. This is the source of the data.
Processor: The data is passed through a numerical filter processor (org.apache.streampipes.processors.filters.jvm.numericalfilter) which checks if the field s0::density is less than 12. The filter is connected to the stream via reference stream01.
Sink: The filtered data is then sent to a data lake (org.apache.streampipes.sinks.internal.jvm.datalake). The sink is configured with several parameters including the mapping of the timestamp (s0::timestamp) and schema update options. The sink is connected to the processor via reference processor01.
Create Options: The pipeline is set to not start automatically (start: false).
API
To create a new pipeline, call the StreamPipes API as follows:
POST /streampipes-backend/api/v2/compact-pipelines
Content-type: application/yml
Accept: application/yml
You must provide valid credentials by either adding a Bearer token or an API key:
X-API-USER: your username
X-API-KEY: your api key
The body of the request should contain the YAML definition.
It is also possible to provide the pipeline specification as a JSON document. In this case, change the Content-type to application/json.