This tutorial shows how you can stream sensor data into StreamPipes from a simulation environment (Factory I/O). The simulation environment is controlled by a "Siemens S7-1200" PLC and shows a conveyor belt which sorts packages by their height. The tutorial is based on the upcoming version 0.70.0 and teaches you how to load the sensor data, build a pipeline, preprocess the data and create visualizations.
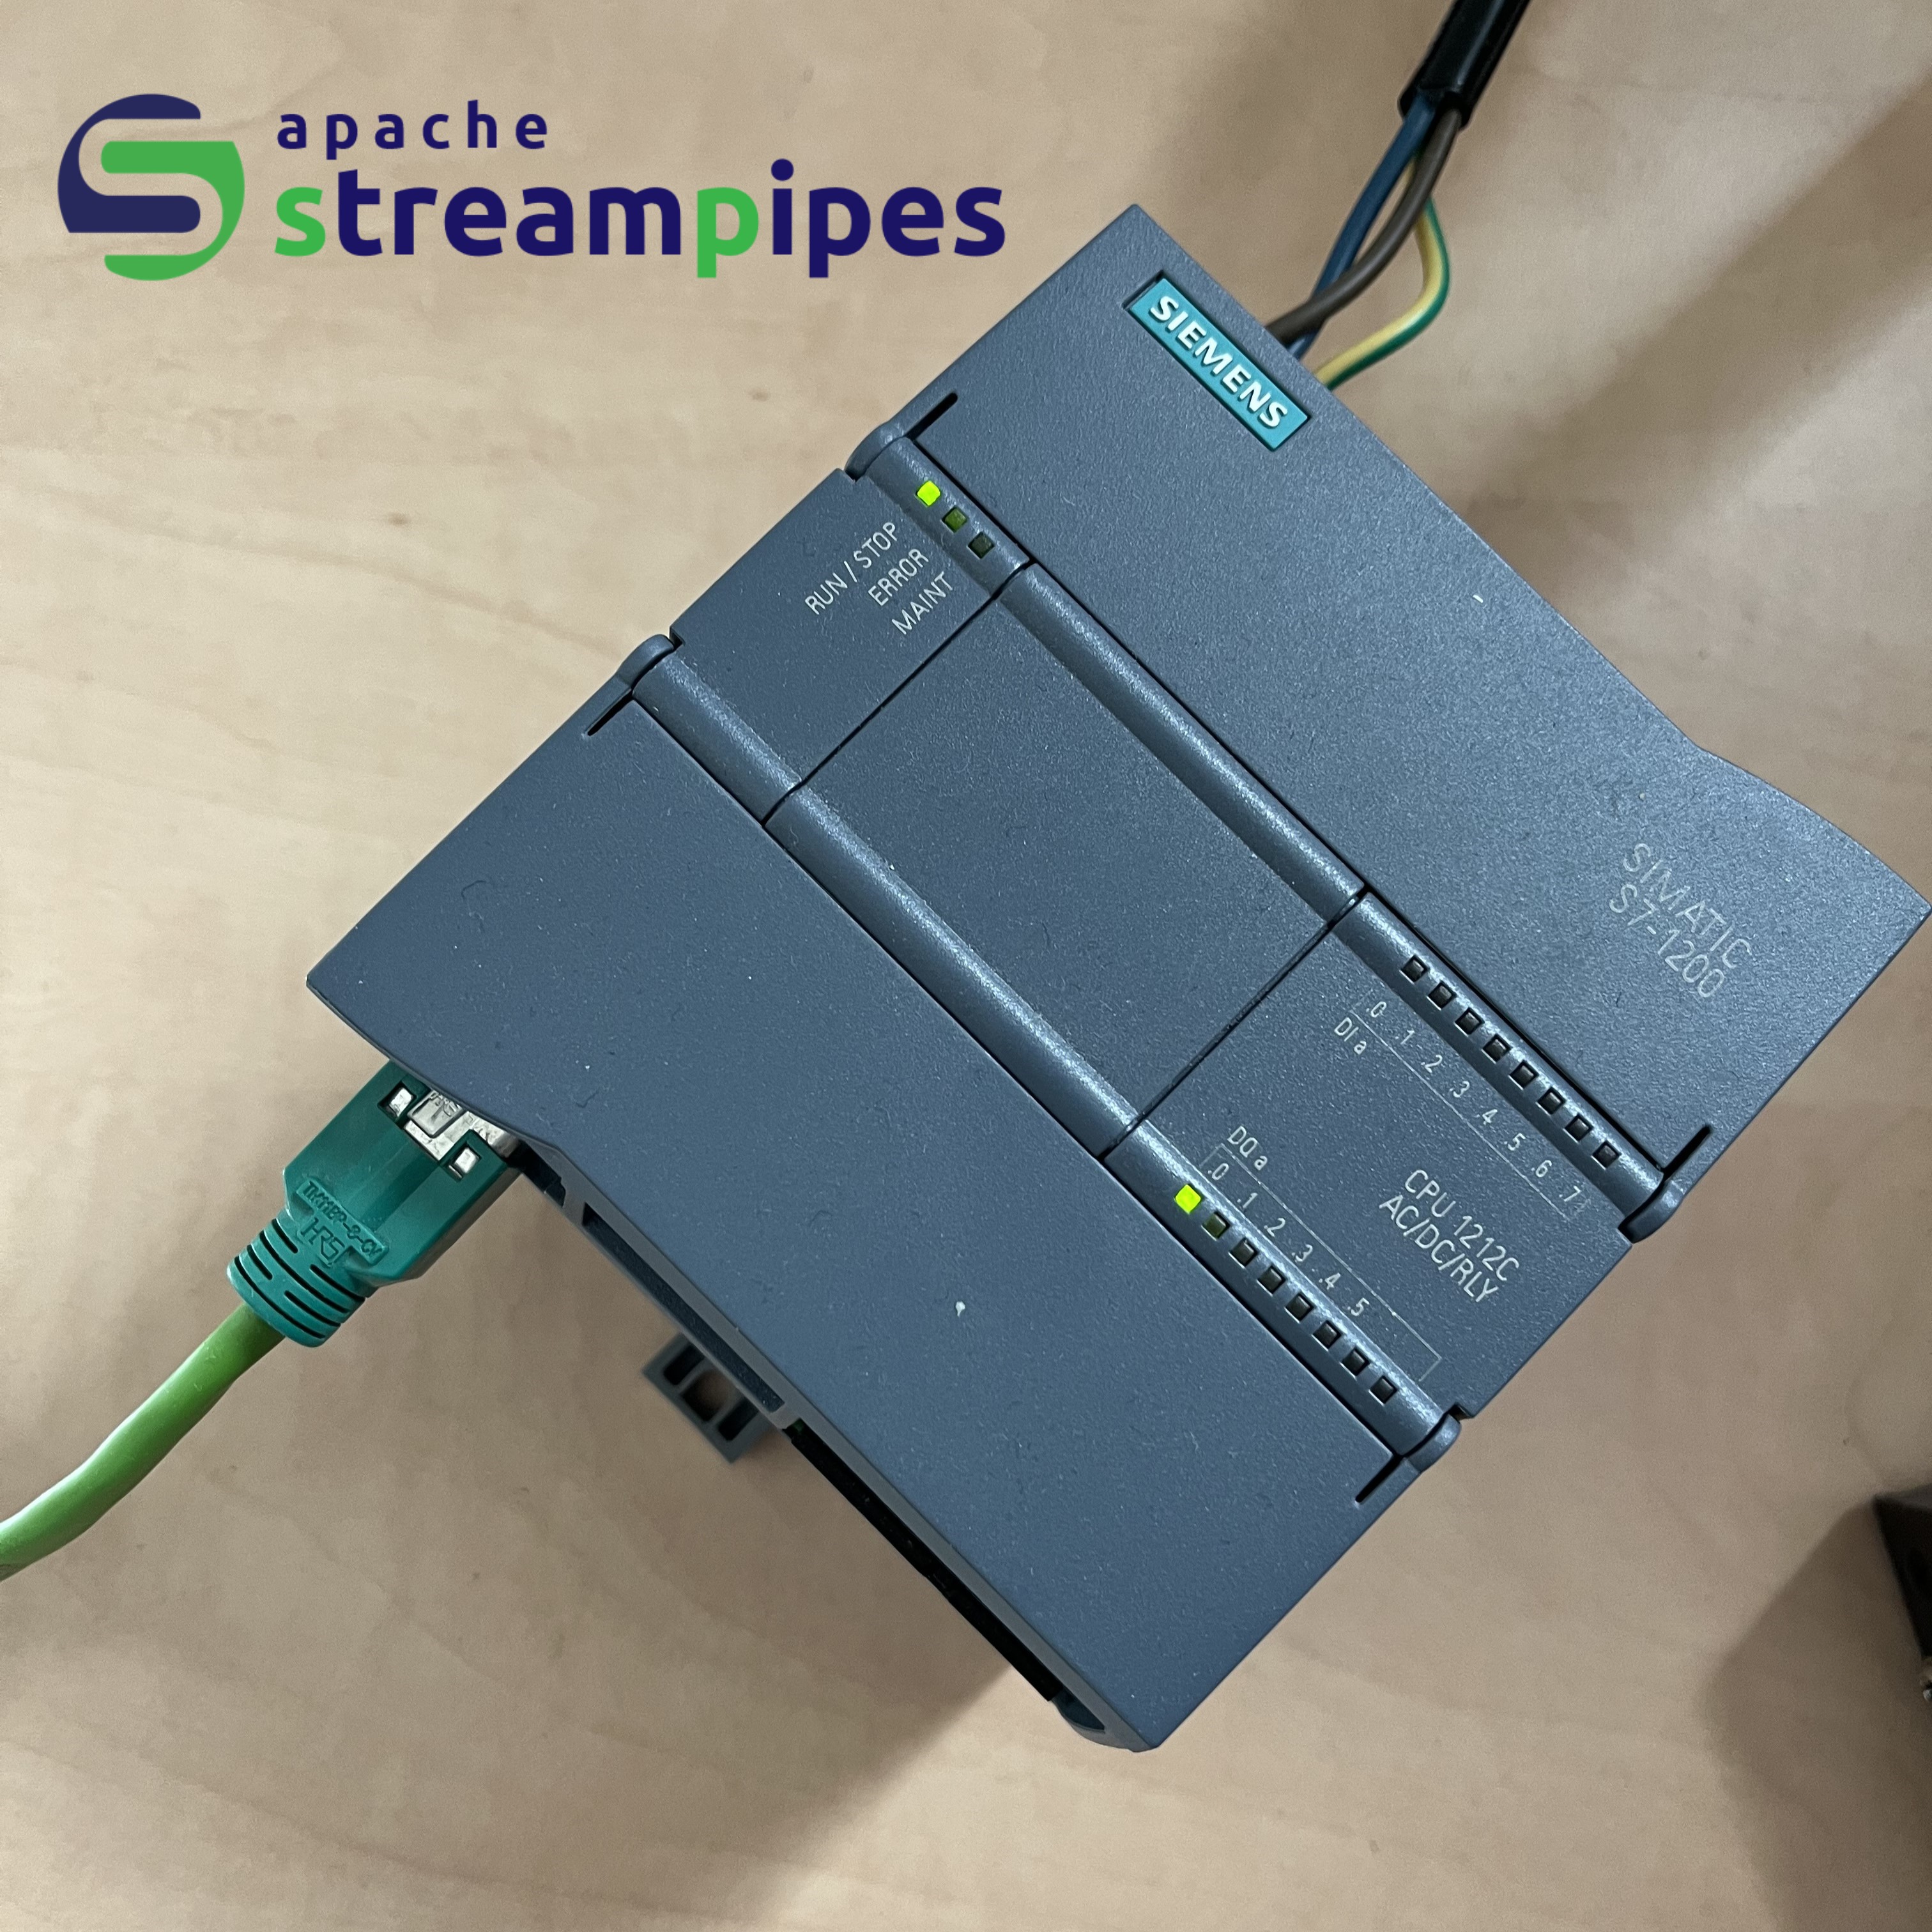
1. Factory I/O
*Factory* I/O is a 3D simulation for virtual factories and is commonly used as a PLC training platform. We will need it to simulate the live data.- Set up Factory I/O and make sure that the Sorting by Height (Basic) simulation works.
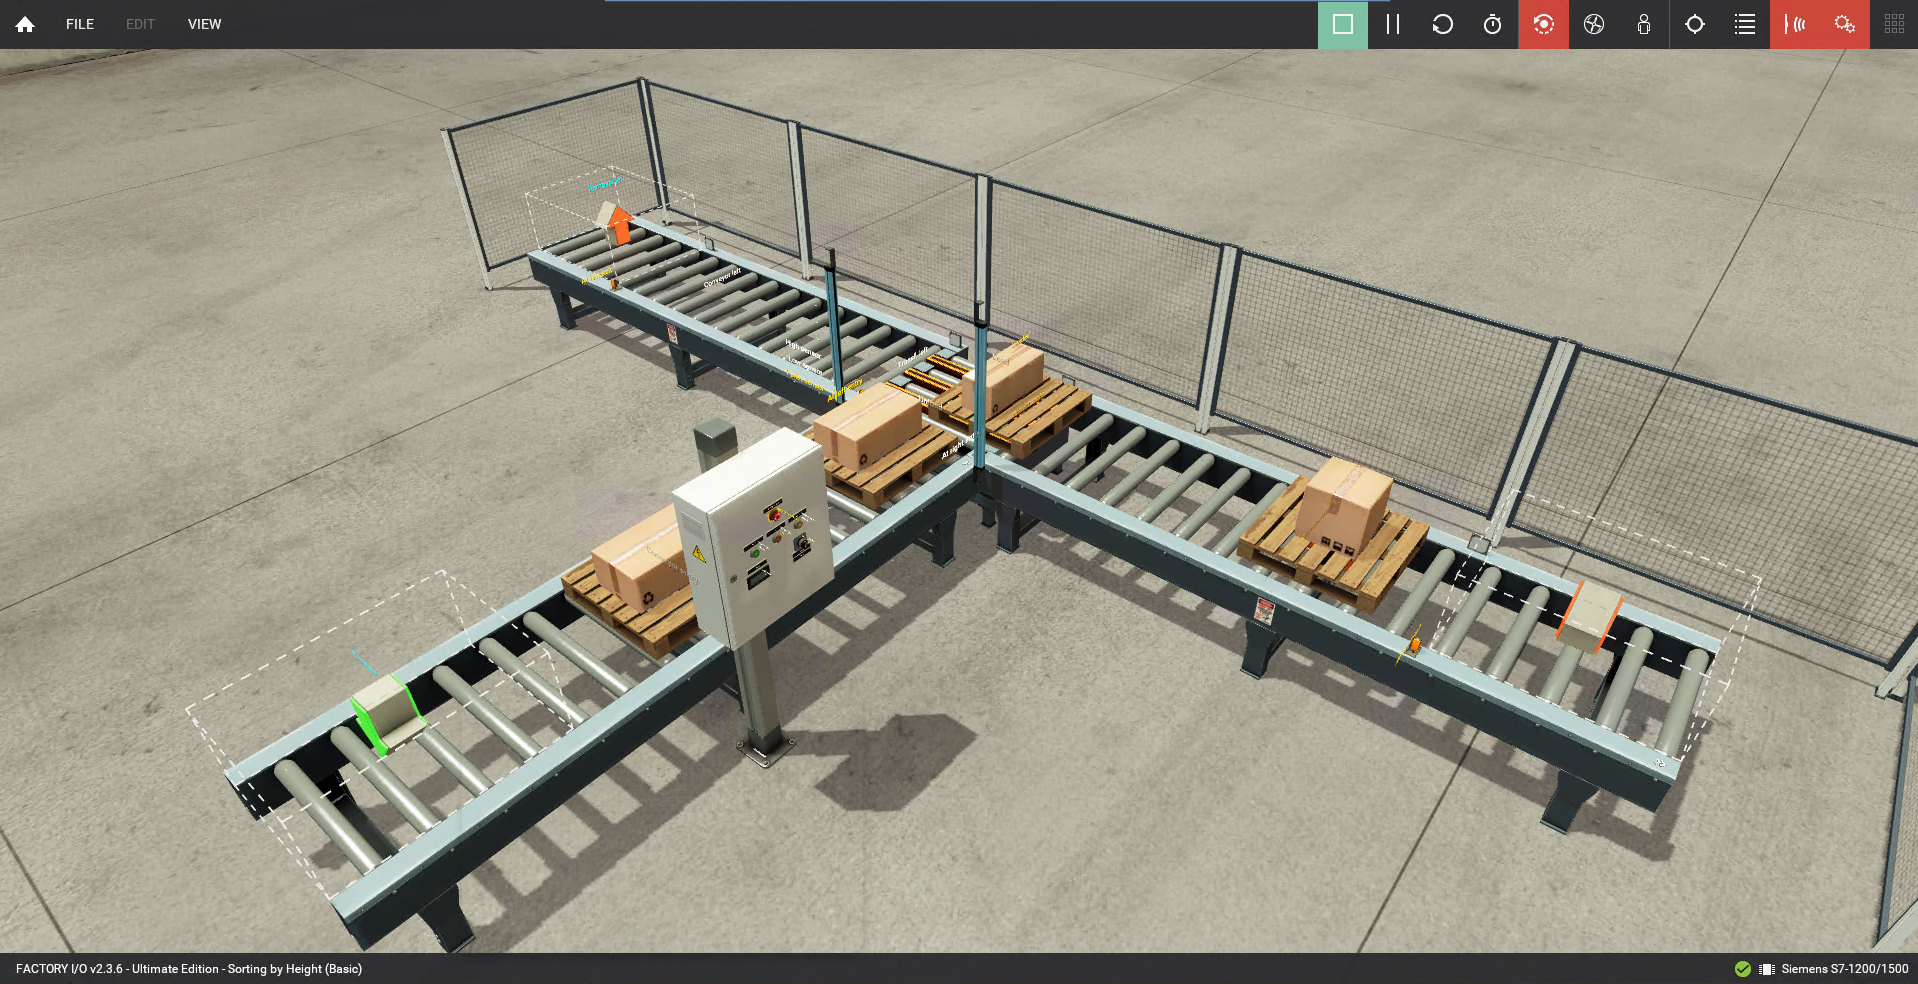
2. Adapter
The next step is to connect the PLC to StreamPipes. To achieve this we need to create an adapter.
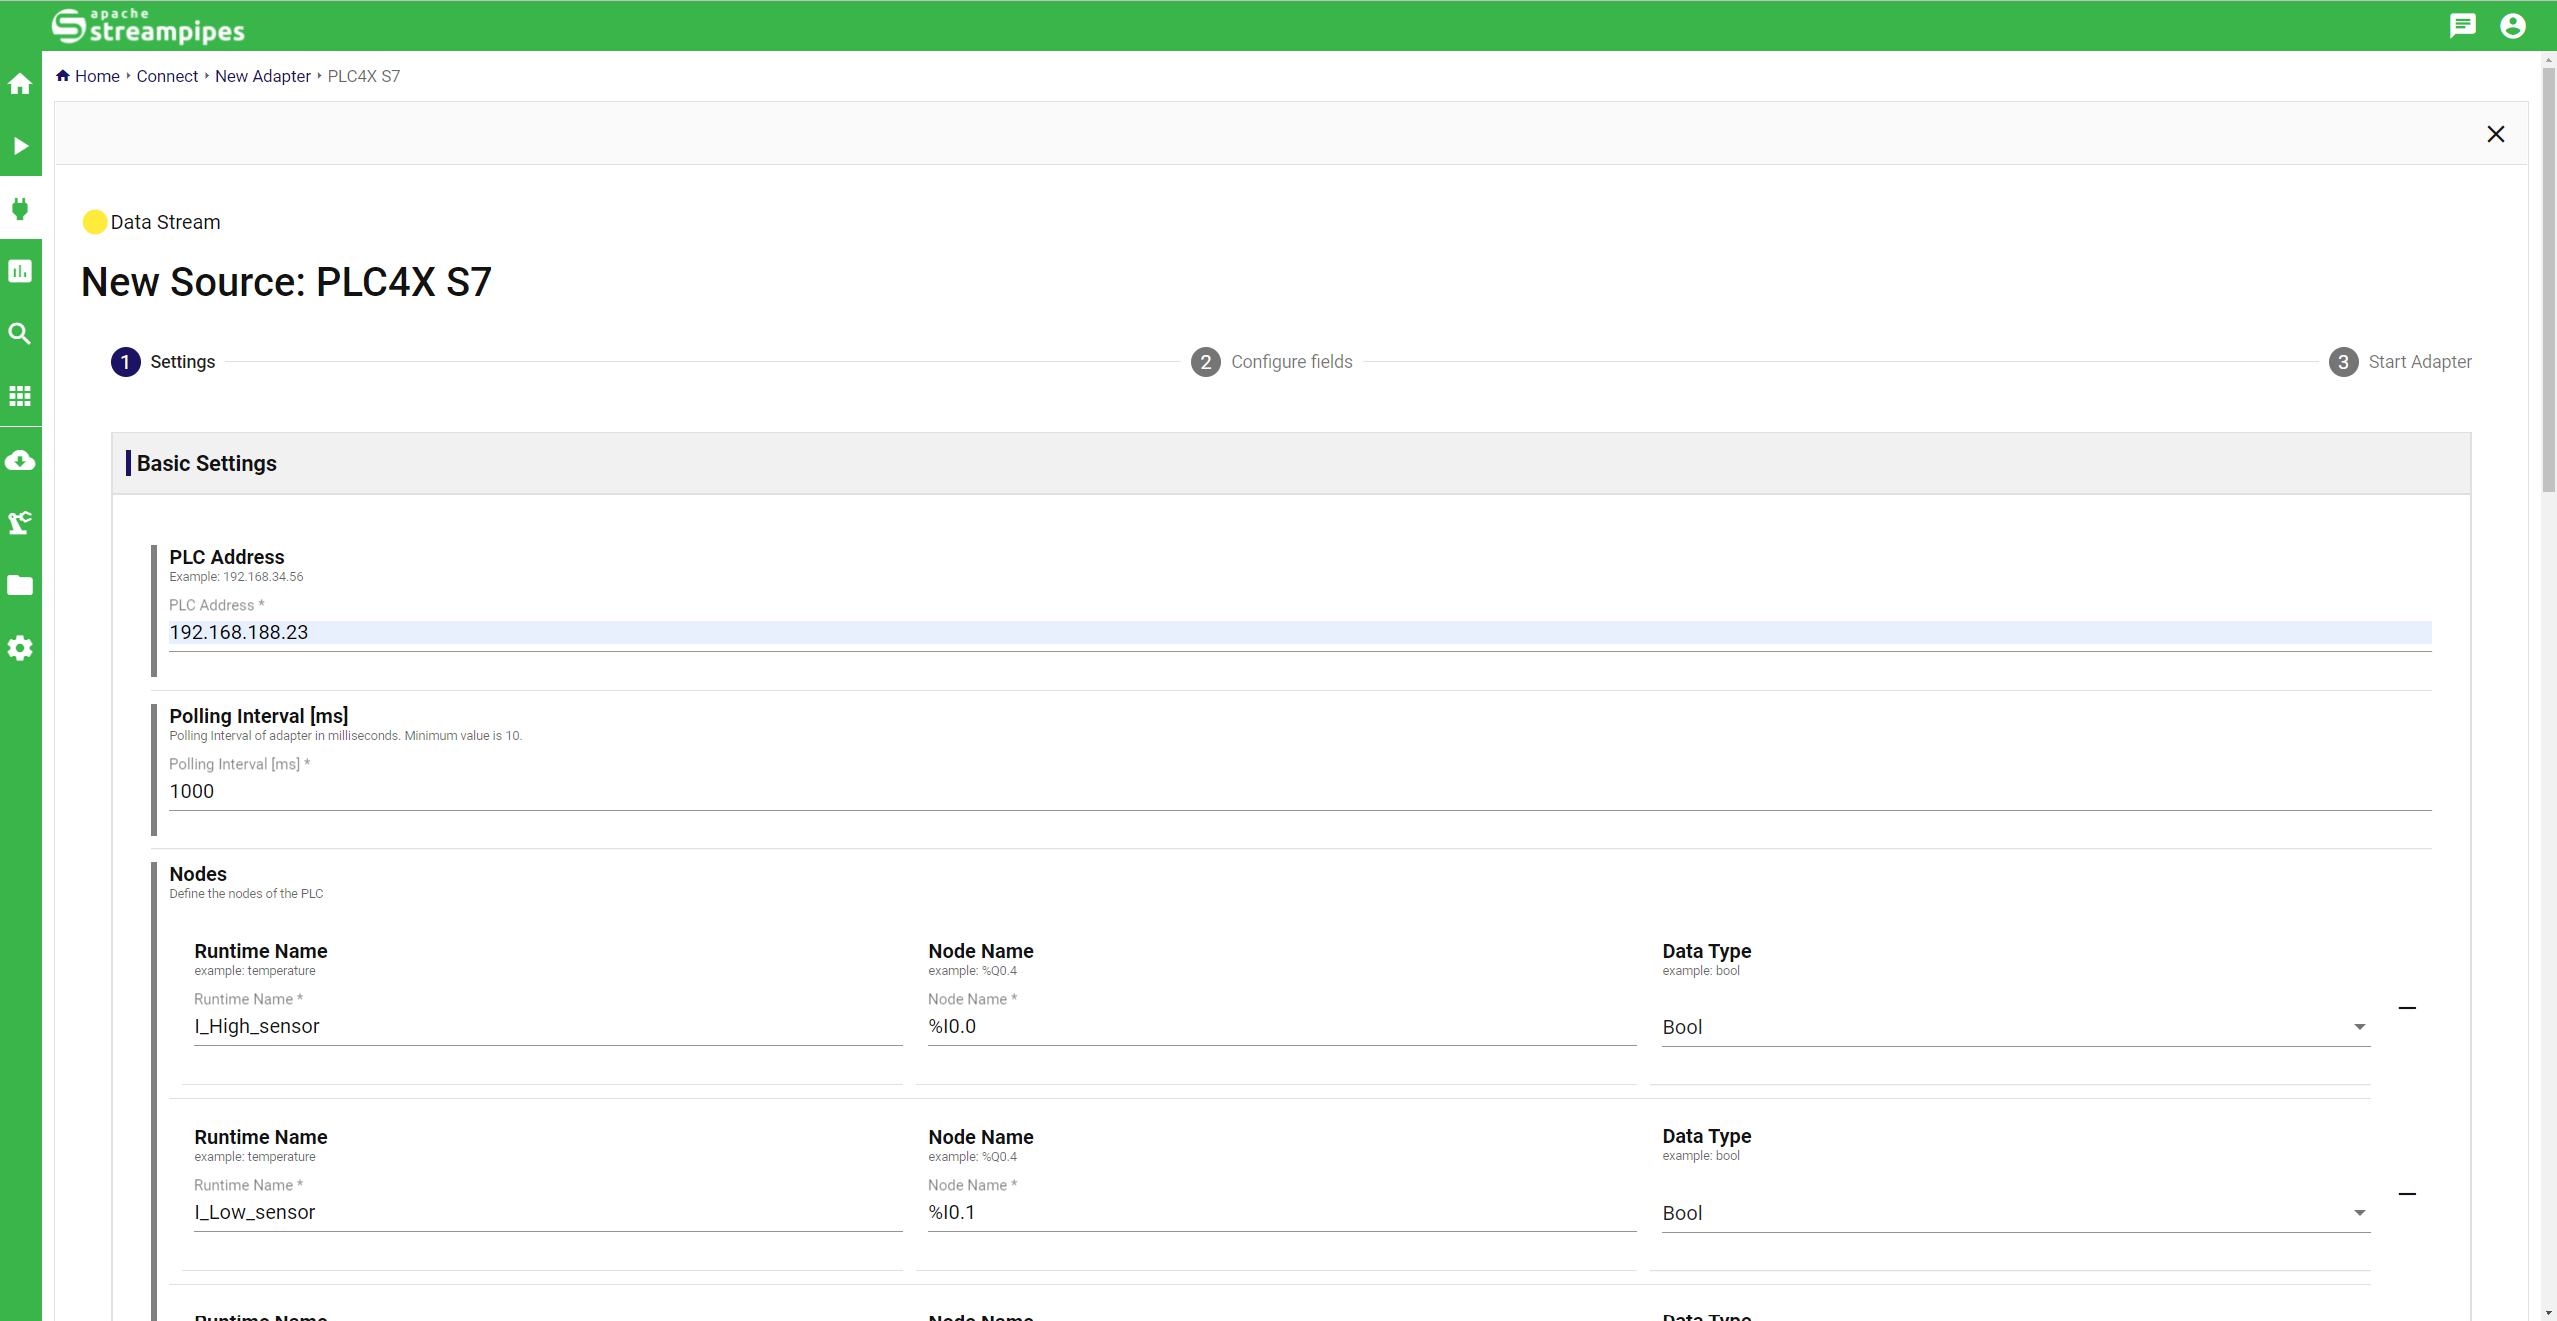
- Start StreamPipes, go to the * *CONNECT menu and create a NEW ADAPTER**.
- Select the PLC4X S7 adapter, insert the IP-address of your PLC and import the file with the PLC tags (see below). Then click NEXT on the bottom right.
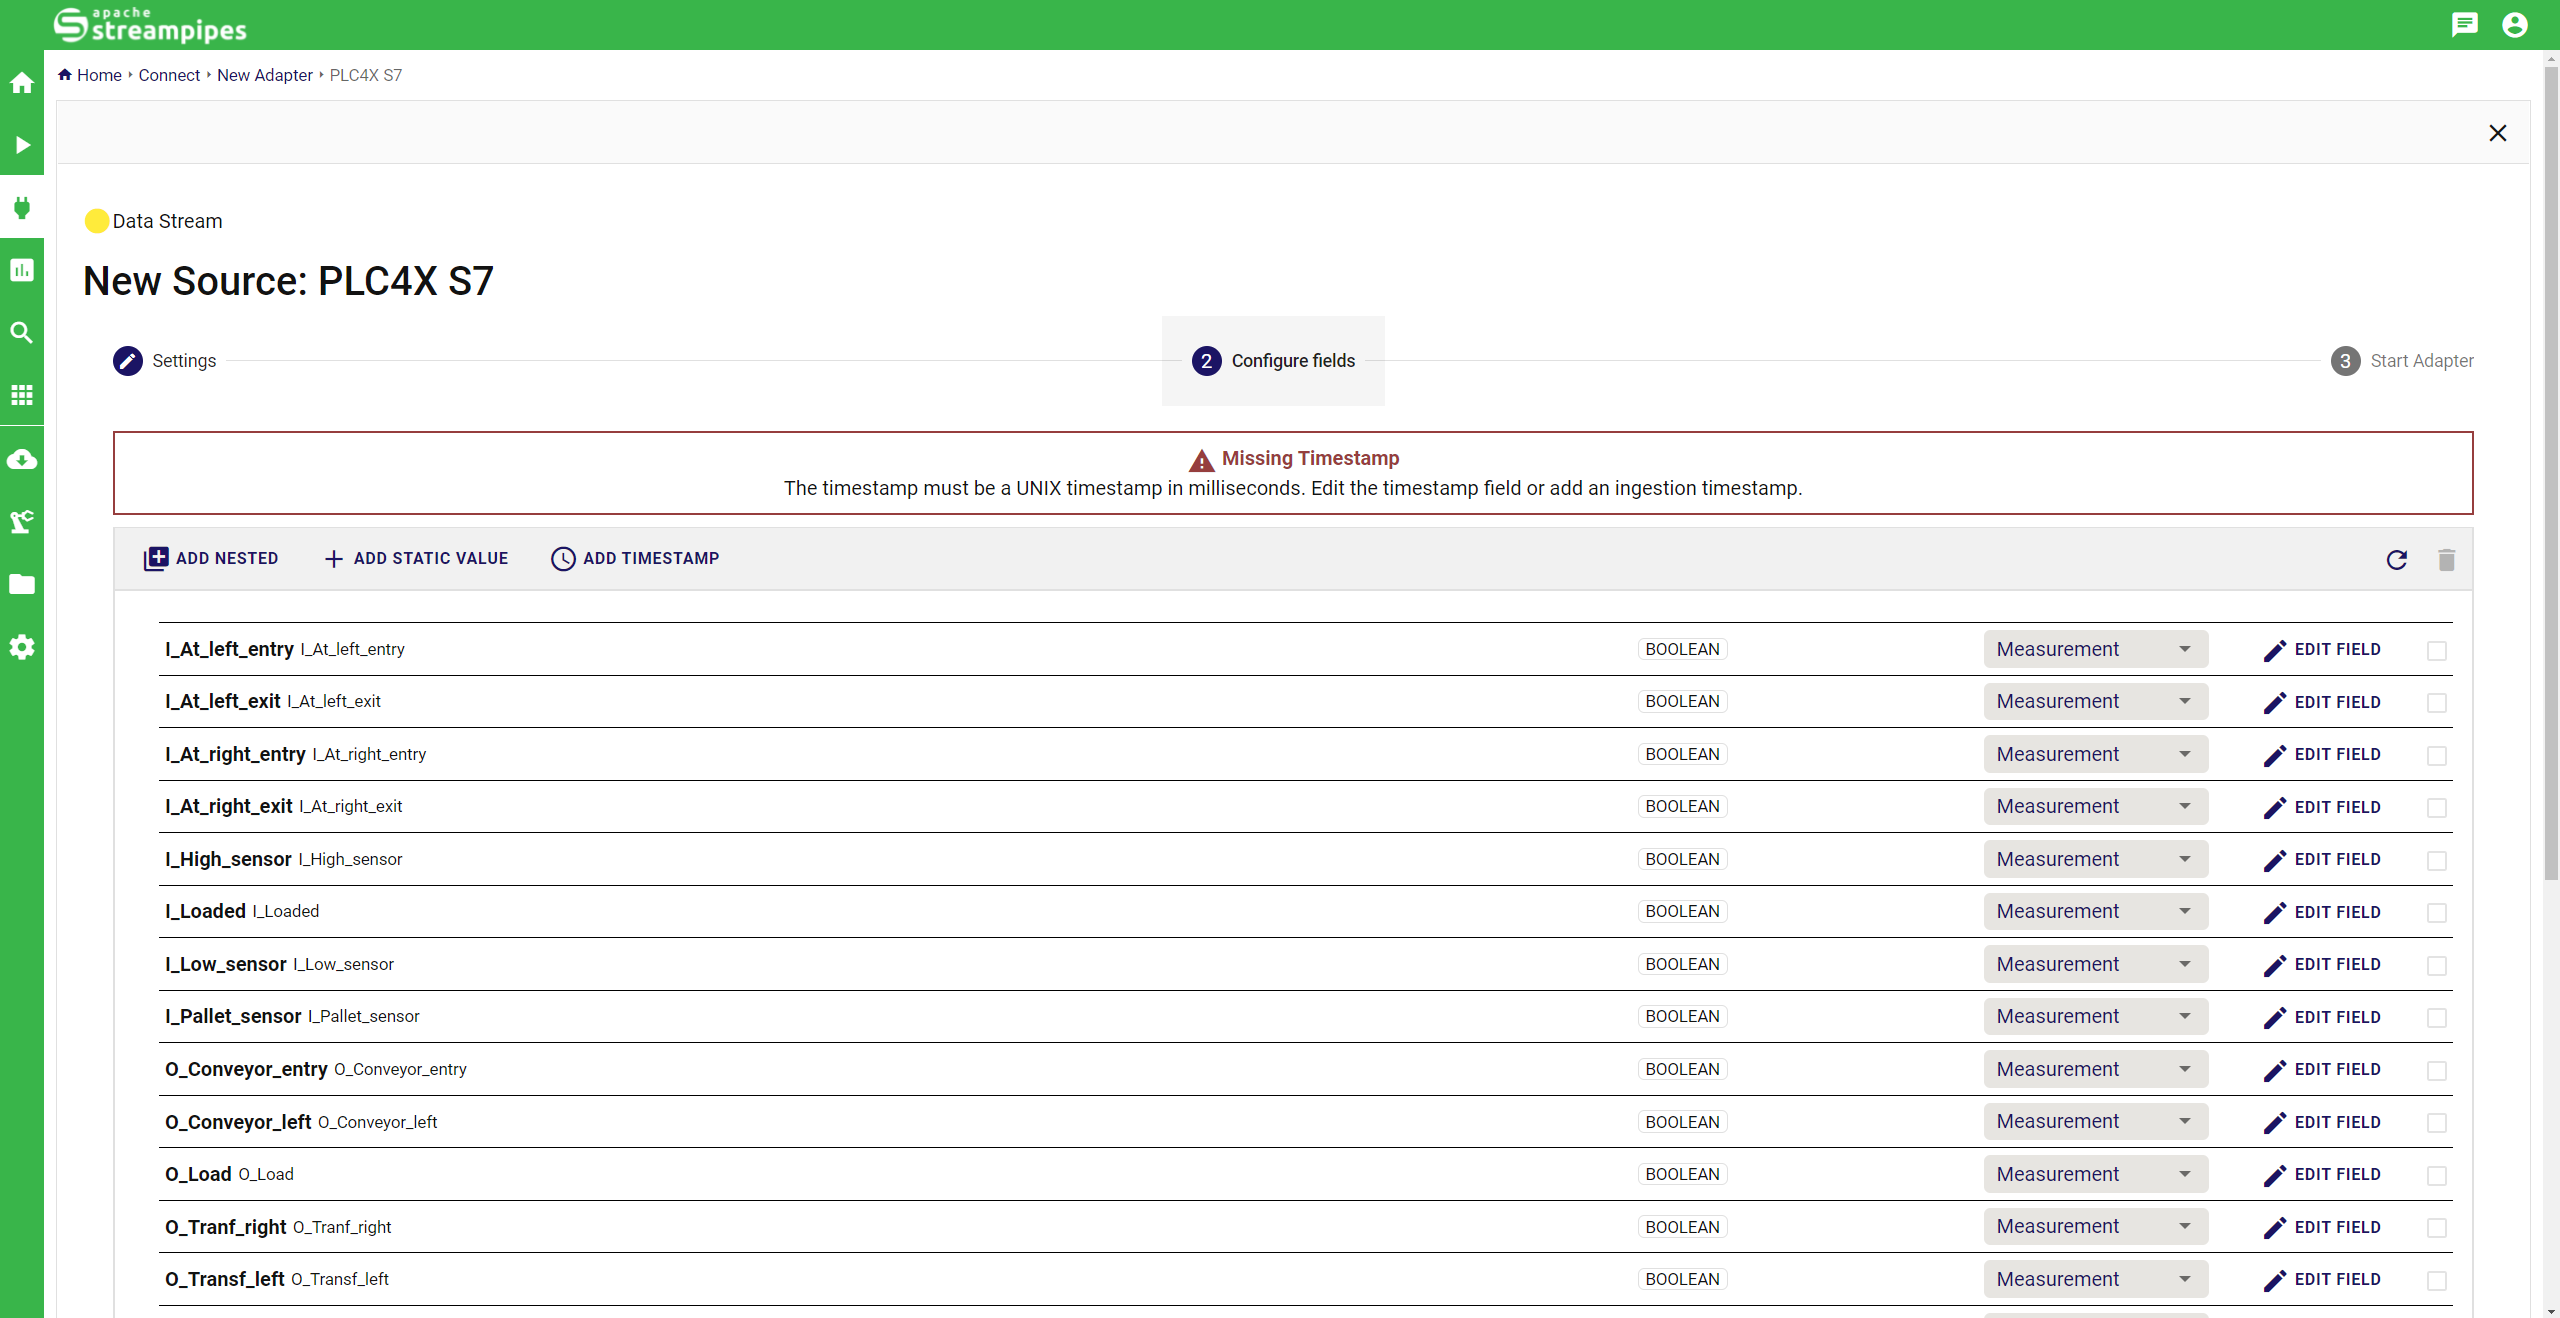
- If the warning "MISSING TIMESTAMP" appears, press ADD TIMESTAMP and then NEXT. This warning occurs because some data sources don't provide a timestamp.
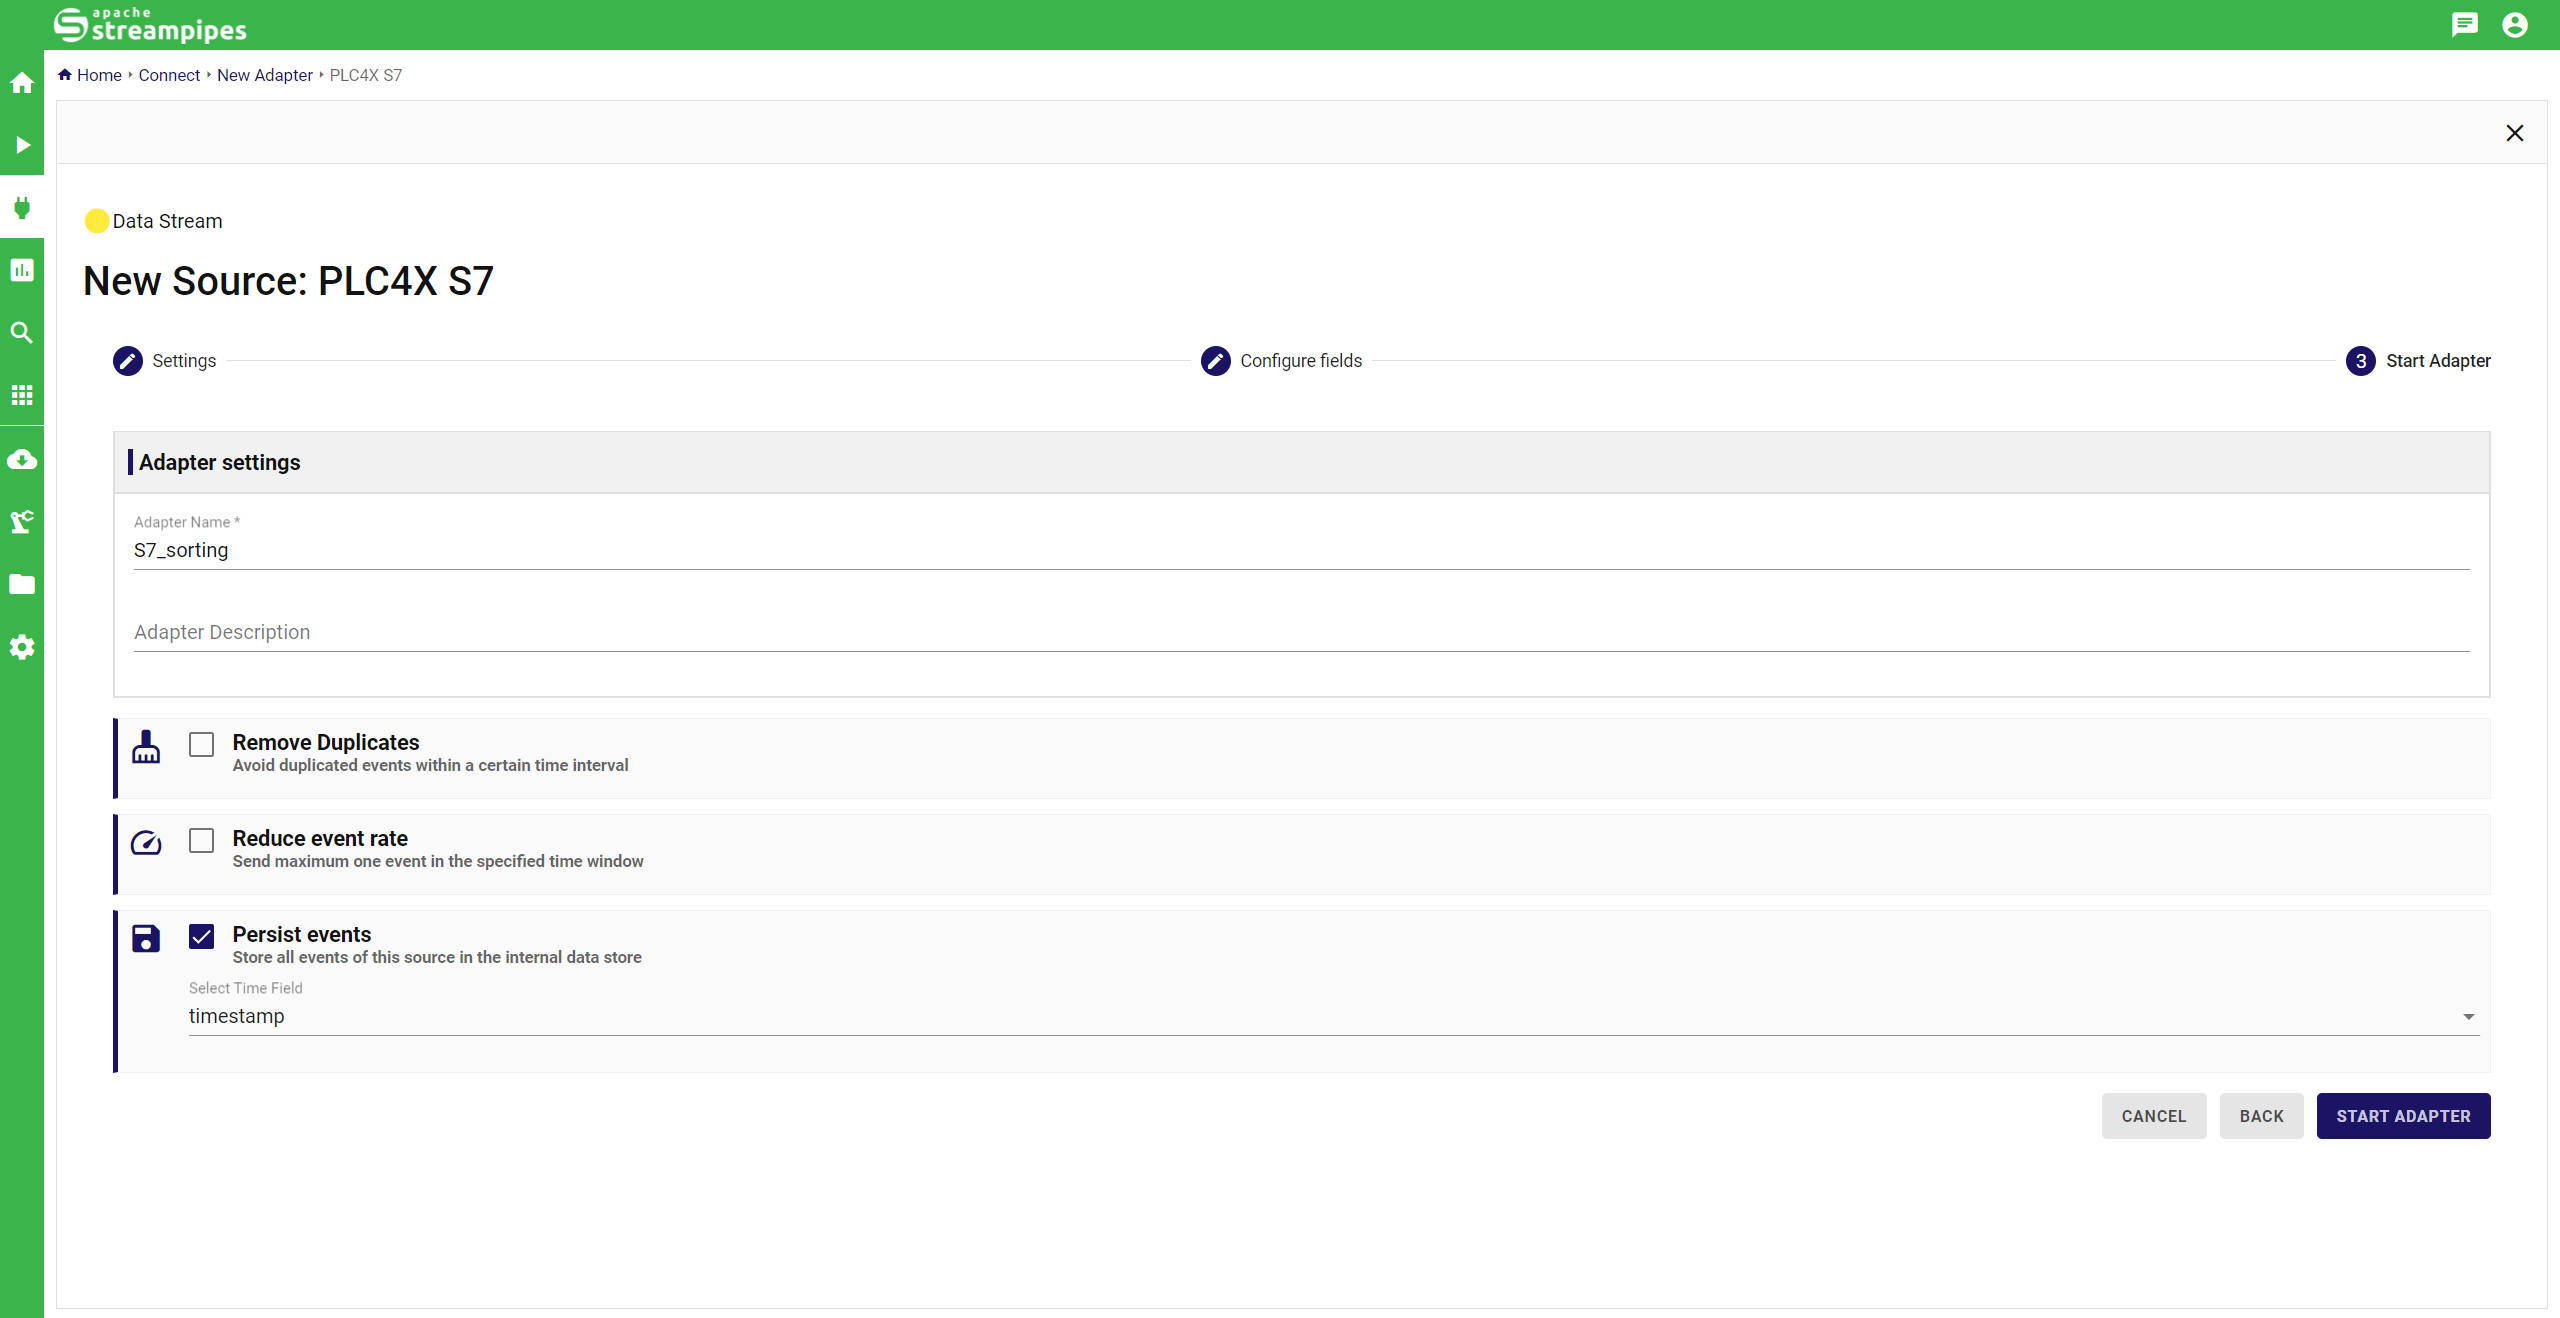
- You can name the adapter "S7_sorting" and select the option PERSIST EVENTS to make sure the data is persisted. The
adapter is now ready to START. (You can check if the adapter is working by pressing the
?symbol in the connect menu and clicking on VALUES to see a live preview).
3. Dashboard for raw data
A dashboard is used to monitor live data from a data stream. We will use it to make sure that the sensor values are updated when the simulation runs.
- Go to the DASHBOARD menu and create a NEW DASHBOARD "Dashboard_sorting". Press the pen symbol to edit the dashboard.
- Click ADD VISUALIZATION and select the automatically created pipeline "Persist S7_sorting". Choose the TABLE widget, configure it by pressing SELECT ALL and CREATE the widget.
- Change the size of the table as you like and SAVE the dashboard.
- The values should now update every 5 seconds. Test it by starting the simulation in Factory I/O.

4. Creating a Data View
The Data View is used to create visualization for persisted data in a Data Lake. You can choose various visualization to explore your data. We will create a table to see the stored data and a bar chart to take a closer look at a single sensor.
- Create a NEW DATA VIEW "Sorting" in the DATA EXPLORER menu and edit the view.
- Select the "Persist S7_sorting" pipeline at the NEW WIDGET menu, SELECT ALL fields and press NEXT.
- Select the TABLE visualization. Click SELECT ALL and CREATE.
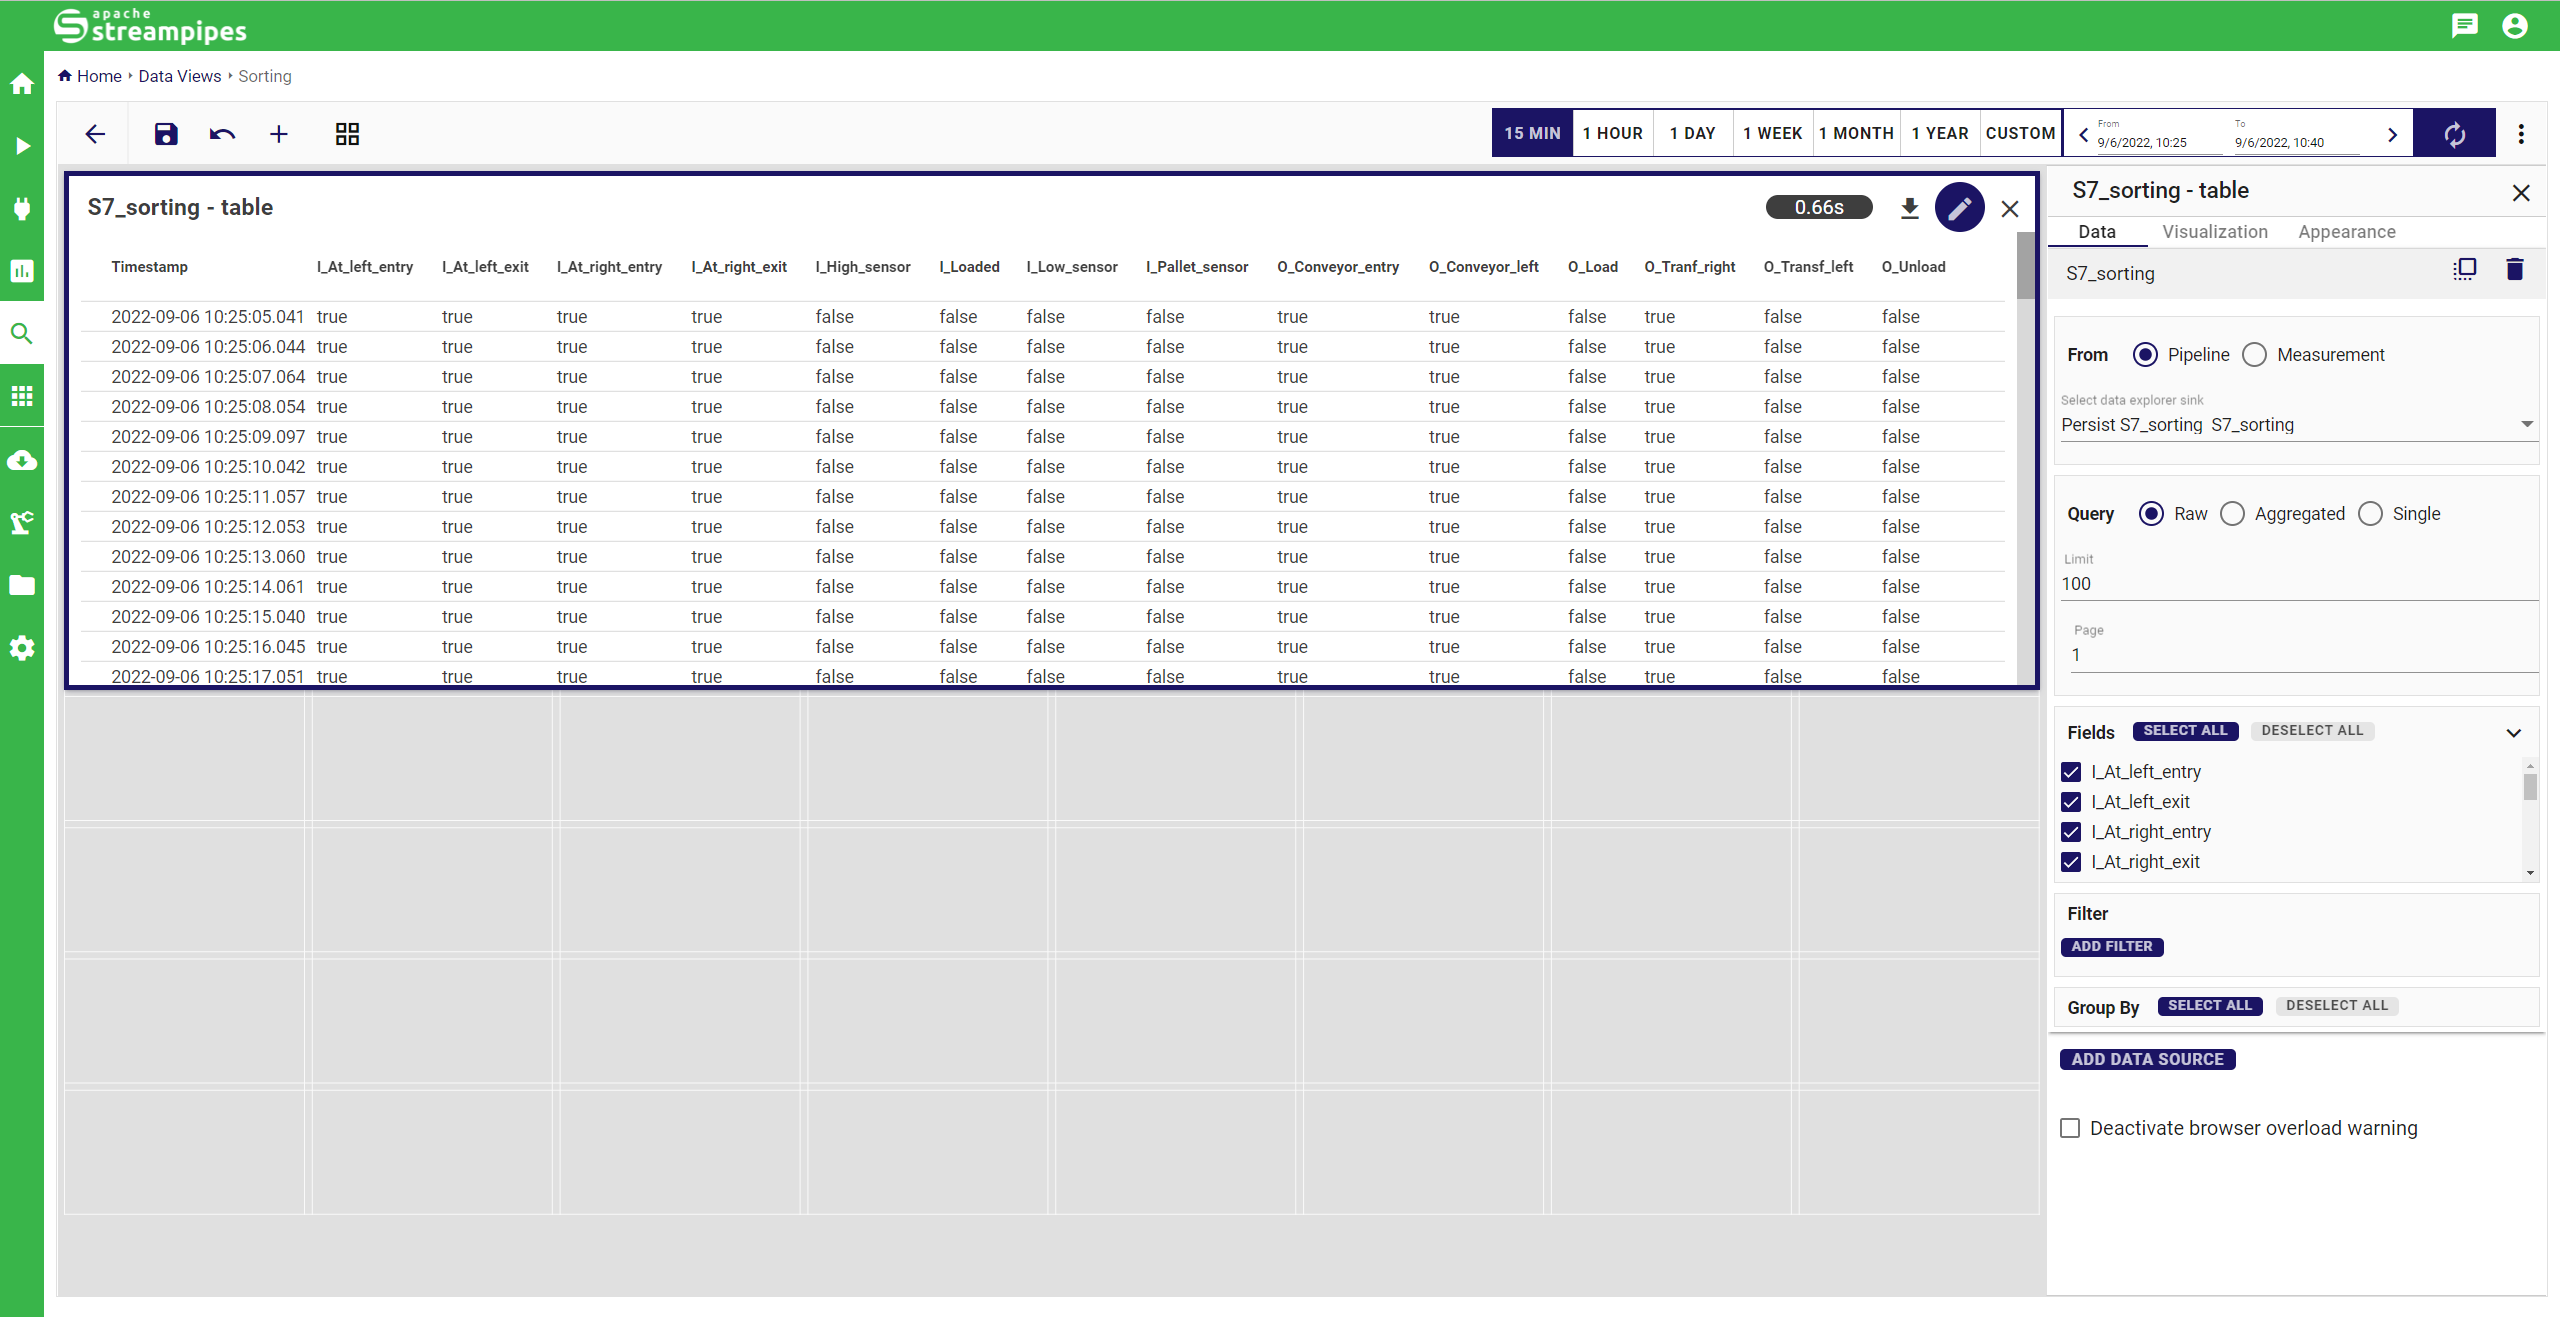
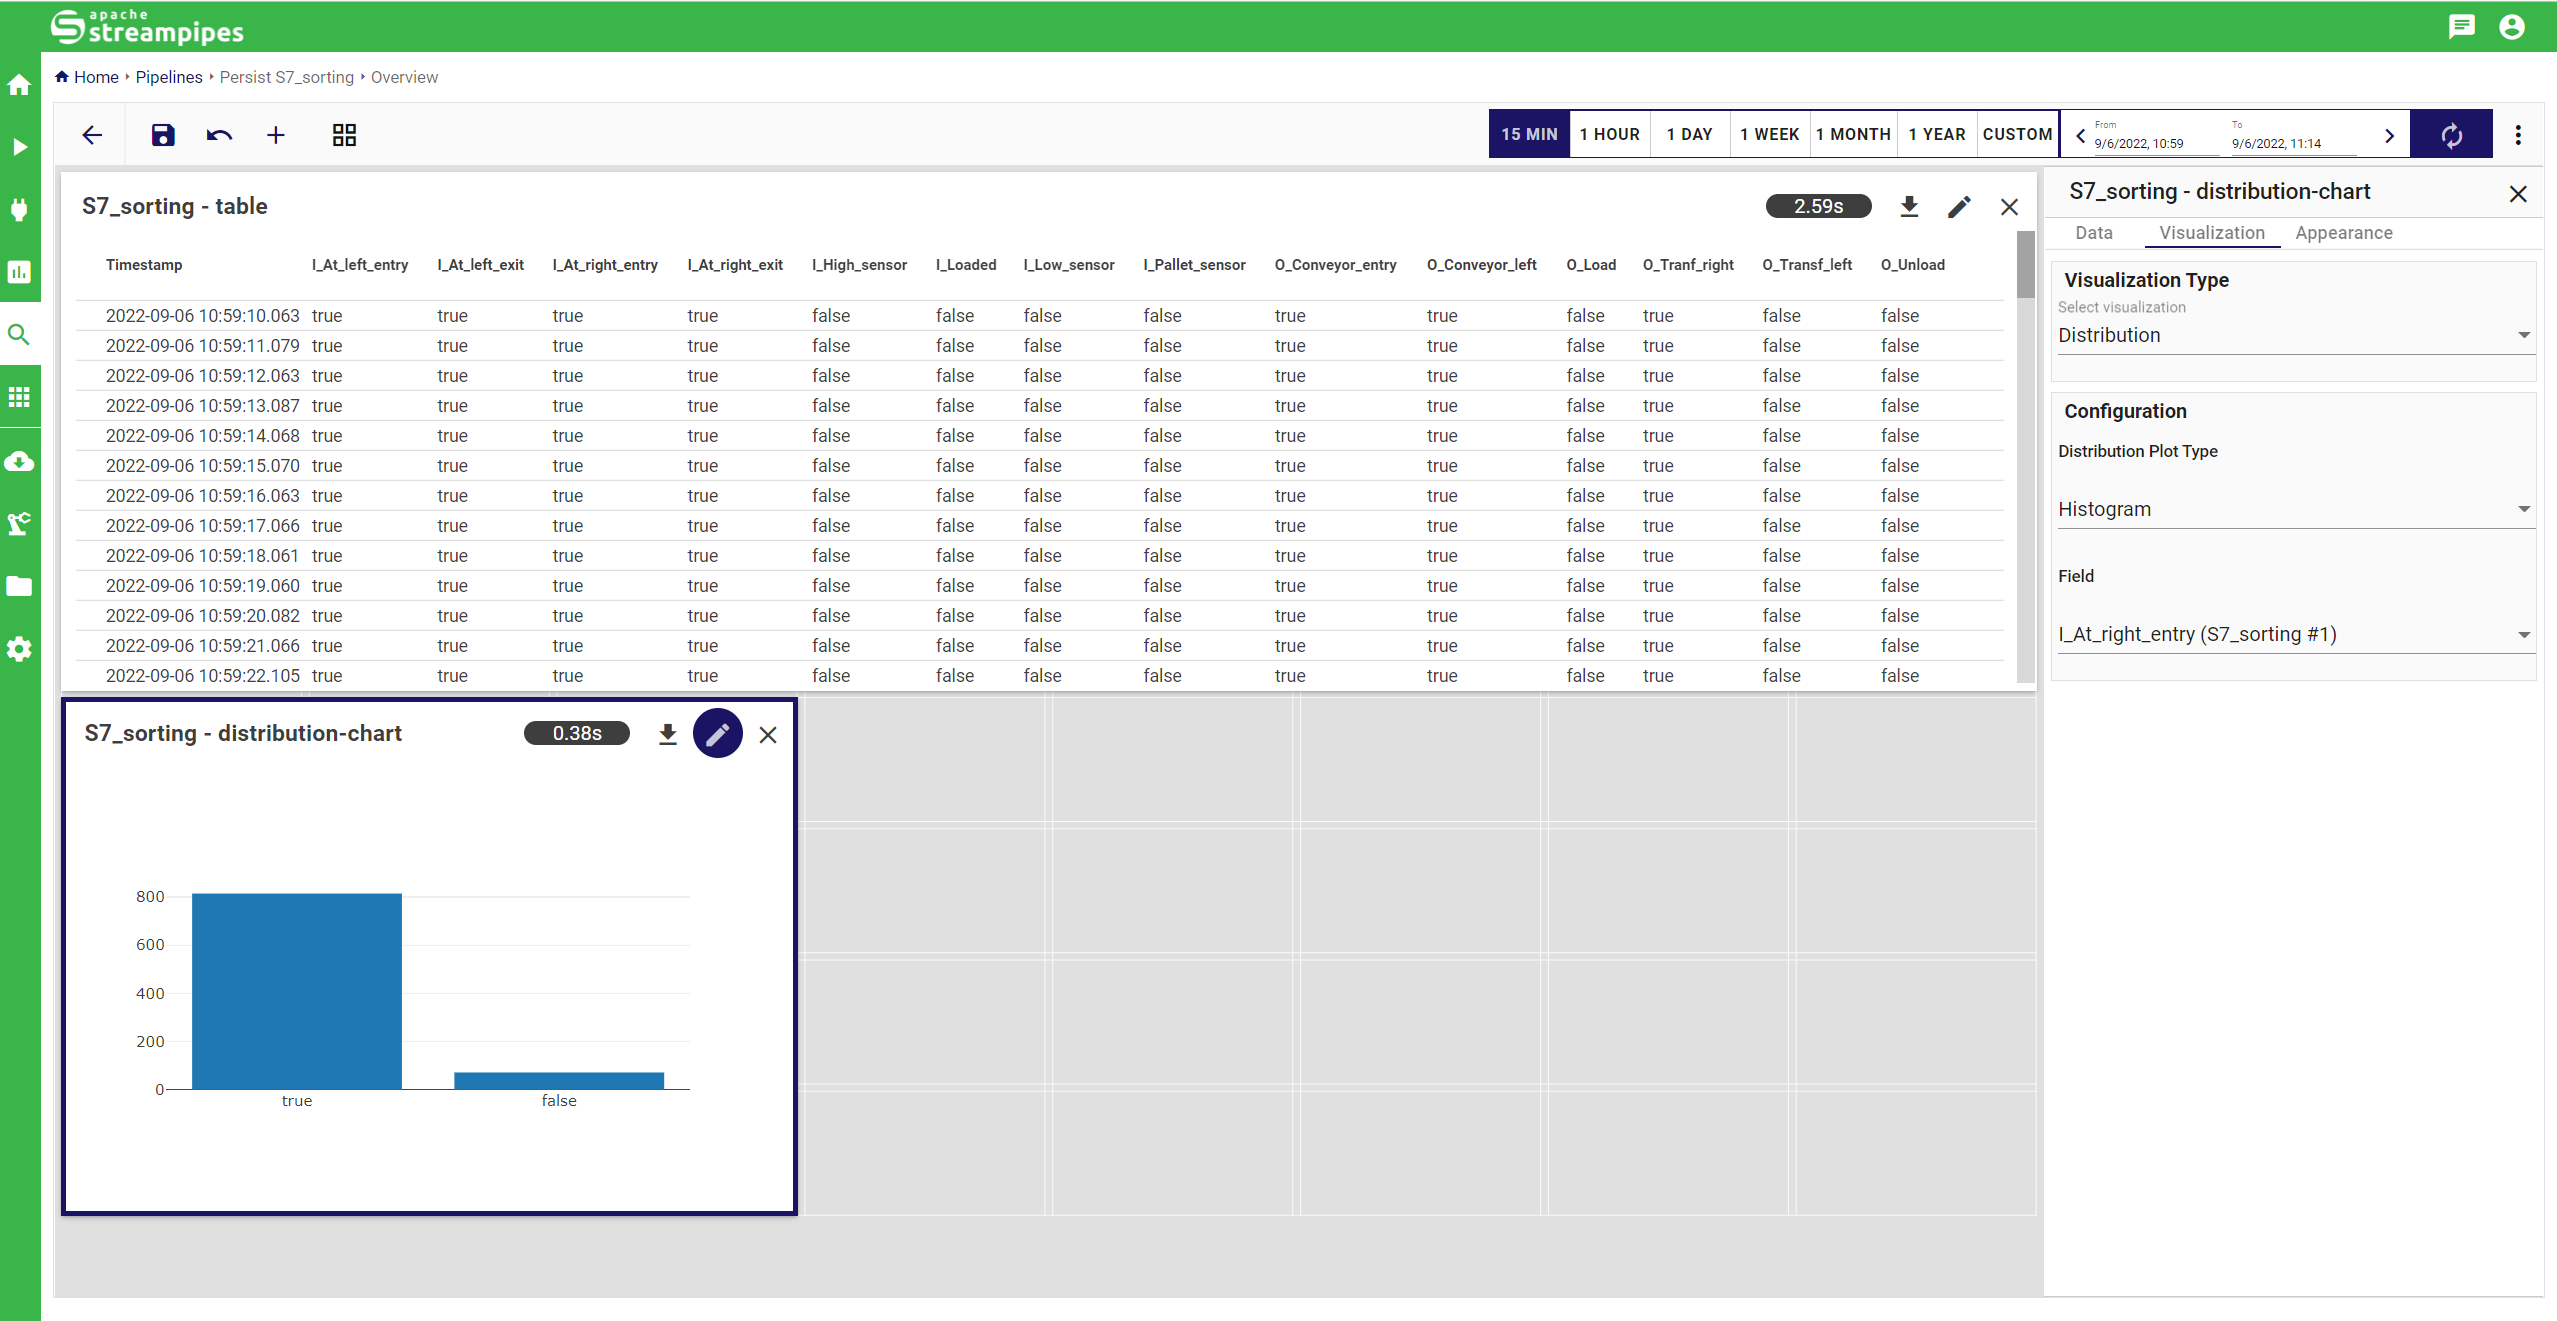
- Now we want to look closer at a single sensor value. Therefore click on the
+symbol on the top left to add a new widget. - Choose the "Persist S7_sorting" pipeline again, set the LIMIT to 1000 and only select the I_At_right_entry field. Now select DISTRIBUTION as visualization and press CREATE. This chart shows how often the sensor returned true or false (package in front of it or not).
5. Modifying the Pipeline
The next step is to change the pipeline to add some preproccessing steps. We want to count the number of large packages which get transported to the right side and we want to measure the time between two arriving packages.
- Therefore STOP the running "Persist S7_sorting" pipeline in the PIPELINE menu and MODIFY the pipeline.
- Add the BOOLEAN COUNTER as new pipeline element. Connect the data source to the counter and configure the element. Select I_At_right_entry as boolean field and change the flank parameter to FALSE -> TRUE. Then add a DATA LAKE and connect the BOOLEAN COUNTER to it. Use "Boolean_Counter" as identifier.
- Add the BOOLEAN TIMER to the pipeline and connect the data source to it. Select I_At_right_entry as boolean field too and select TRUE and SECONDS in the configuration window. Add another DATA LAKE and connect the * *BOOLEAN TIMER** to it. Use "Boolean_Timer" as identifier.
- SAVE the pipeline and click the checkbox START PIPELINE IMMEDIATELY.

6. Dashboard for preprocessed data
After we created two new data field in the last step, we will monitor them in the dashboard.
- Go to the DASHBOARD menu and EDIT the dashboard.
- Click ADD VISUALIZATION and select "Persist S7_sorting: Boolean_Counter". Create a TABLE widget as before and SELECT ALL fields.
- Now add one last table. Choose "Persist S7_sorting: Boolean_Timer" and only select the measured_time field
- Test your pipeline by starting the simulation again. The counter should now count up when a package passes the sensor on the right side and the "measured_time" should show the time since the last package arrived.

7. Final Data View
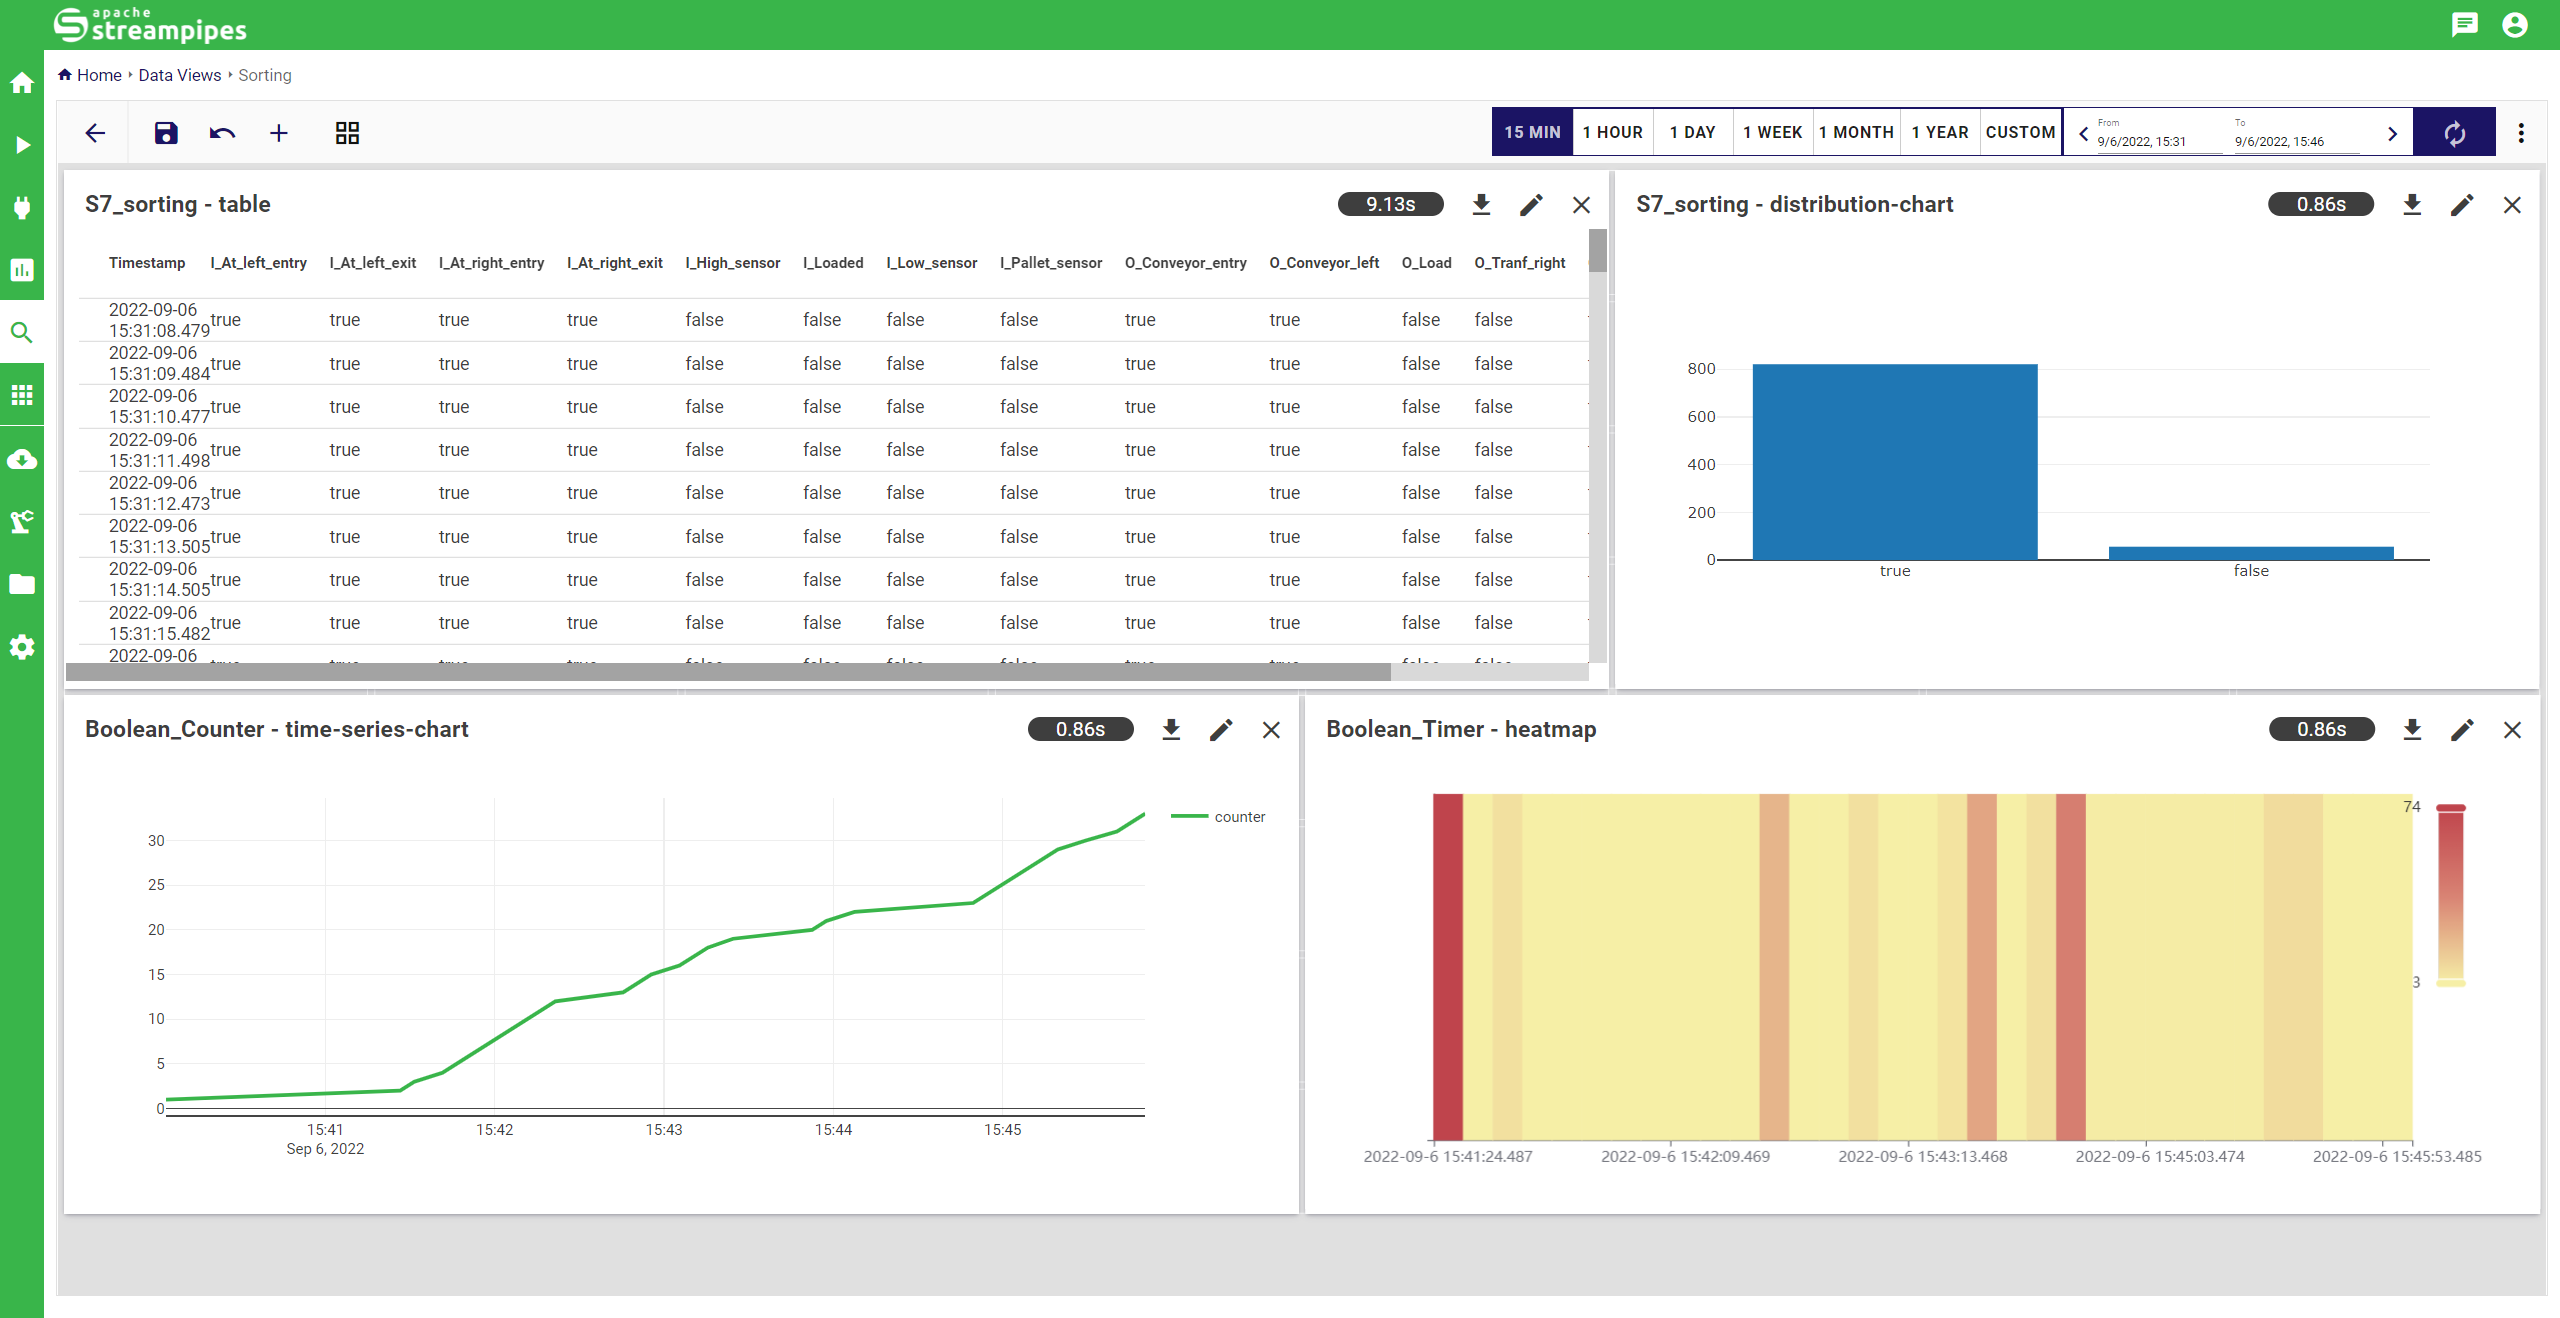
Finally we want to improve the Data Explorer and create visualizations with the preprocessed data. We will create a time series to verify when a new package arrived and a heat map to check the time between two packages.
- Go to the DATA EXPLORER menu and edit the data view.
- Click ADD WIDGET and choose the pipeline "Persist S7_sorting: Boolean_Counter". Select the counter field and choose the TIME SERIES visualization.
- Create another widget. Choose the "Persist S7_sorting: BooleanCounter" pipeline and select the measured_time field. Then select the HEATMAP and use "measured_time" as HEAT VALUE
Summary
In this tutorial we learned how to connect a PLC to StreamPipes, monitor the data stream with a dashboard, create a pipeline with different preprocessing steps and visualize the data in the Data View. But we just focused on the basics, so feel free to try out your own ideas and use different preprocessing steps, create new visualizations or try out another simulation environment.
CSV file for PLC tags
Runtime Name,Path,Data Type,Node Name,Comment,Hmi Visible,Hmi Accessible,Hmi Writeable,Typeobject ID,Version ID
I_High_sensor,Tag table_1,Bool,%I0.0,,True,True,True,,
I_Low_sensor,Tag table_1,Bool,%I0.1,,True,True,True,,
I_Pallet_sensor,Tag table_1,Bool,%I0.2,,True,True,True,,
I_Loaded,Tag table_1,Bool,%I0.3,,True,True,True,,
I_At_left_entry,Tag table_1,Bool,%I0.4,,True,True,True,,
I_At_left_exit,Tag table_1,Bool,%I0.5,,True,True,True,,
I_At_right_entry,Tag table_1,Bool,%I0.6,,True,True,True,,
I_At_right_exit,Tag table_1,Bool,%I0.7,,True,True,True,,
O_Conveyor_entry,Tag table_1,Bool,%Q0.0,,True,True,True,,
O_Load,Tag table_1,Bool,%Q0.1,,True,True,True,,
O_Unload,Tag table_1,Bool,%Q0.2,,True,True,True,,
O_Transf_left,Tag table_1,Bool,%Q0.3,,True,True,True,,
O_Tranf_right,Tag table_1,Bool,%Q0.4,,True,True,True,,
O_Conveyor_left,Tag table_1,Bool,%Q0.5,,True,True,True,,